Guide · version 1.0
Ocular VMS installation guide
From an empty server to every camera monitored. It takes about 30 minutes, depending on your internet speed and the number of NVRs.
1. About Ocular VMS
Ocular VMS is a web application installed on your own server to monitor a Hikvision CCTV system. It connects to NVRs and cameras over ISAPI, to PoE switches over SNMP, and pings every device regularly. Footage stays on the NVRs; Ocular VMS reads, checks, and displays it.
Main features:
- Dashboard and alerts: online, slow, and offline camera counts; an issue list; sound alerts in the control room and Telegram messages.
- Video wall and playback: up to 16 cameras per screen, full screen per camera, playback by date, digital zoom, clip download.
- Recording status: automatic checks every 15 minutes, gap detection, daily history, and retention per camera.
- NVRs: disk status and SMART, CPU, memory, uptime, and clock offset.
- Network: PoE switches, camera-to-port mapping, topology, IP scanner, and Hikvision device discovery (SADP).
- On-premise analytics: people counting and guard zones, running on the server CPU.
- Reports: uptime, recordings, offline cameras, field checks, power usage, Excel export.
- Administration: admin and view-only accounts, activity log, automatic backups, Indonesian and English interface.
2. System requirements
| Operating system | Ubuntu Server 22.04 or 24.04, Debian 12, Windows 11 version 22H2 or later, or Windows 10 version 22H2 (with limitations) |
|---|---|
| CPU | 4 cores or more. An Intel CPU with integrated graphics speeds up H.265 video conversion (Linux only). |
| RAM | 8 GB or more |
| Disk | 20 GB free. Footage stays on the NVRs, so no large disk is needed. |
| Network | The server must reach the NVRs, cameras, and switches. A fixed (static) server IP is recommended. |
| Internet | Needed for installation and activation. Optional afterwards (for Telegram and automatic license retrieval). |
| Device accounts | Admin (or operator) username and password for each NVR. For switches: an SNMP community or SNMPv3 account if you want port data. |
| Hikvision NVR | ISAPI enabled (on by default on most NVRs; on some firmware under Configuration, Network, Advanced Settings, Integration Protocol), RTSP enabled, and the clock on NTP. An operator account needs live view, playback, and download rights. |
| Network ports | From the server to devices: NVR HTTP/HTTPS (80/443), RTSP (554), ping (ICMP), and SNMP UDP 161 for switches. From monitoring computers to the server: the application web port (default 8080). |
| Video in the browser | An H.264 camera sub-stream is recommended so video plays in every browser (recent Chrome, Edge, Firefox). It can be changed from the application. |
Check ISAPI before installing
From a computer on the same network, open http://<NVR-IP>/ISAPI/System/deviceInfo in a browser and enter the NVR username and password. If XML text appears with the NVR model and serial number, ISAPI is enabled and Ocular VMS can connect. If the page does not open or is refused, check the IP, HTTP port, and the ISAPI setting on the NVR.
Use a dedicated server that runs 24 hours a day. A mini PC is enough for dozens to hundreds of cameras.
3. Installing on Linux
Sign in to the server over SSH and run this single command:
$ curl -fsSL https://ocularvms.my.id/install.sh | sudo bash
The installer checks the server, installs Docker if needed, downloads the latest version, creates the configuration with random passwords, and starts the application. It usually takes 5 to 15 minutes depending on the internet speed. When it finishes, the address and initial sign-in are shown:
Ocular VMS: installer

==> Mengunduh Ocular VMS 1.0.0
==> Membuat konfigurasi
==> Mengunduh image aplikasi (sekitar 1,1 GB)
 Image registry.ocularvms.my.id/db:2.31.0-pg16 Pulled
 Image registry.ocularvms.my.id/web:1.0.0 Pulled
 Image registry.ocularvms.my.id/backend:1.0.0 Pulled
 Image registry.ocularvms.my.id/stream:1.0.0 Pulled
 Image registry.ocularvms.my.id/counter:1.0.0 Pulled
==> Menjalankan aplikasi
==> Menunggu aplikasi siap

==> Terpasang!
Ocular VMS 1.0.0
Alamat   : http://192.168.1.10:8080
Username : admin
Password : Q7mWk2Rf9LxT4p
Segera ganti password setelah login pertama (Pengaturan, Akun saya), lalu hapus berkas ini.

Langkah berikutnya:
  1. Buka alamat di atas dan login.
  2. Buka menu Lisensi dan klik Beli lisensi (kode perangkat terisi otomatis).
  3. Setelah membayar, klik Ambil lisensi dari portal.

Perintah di server:  sudo ocularvms status | update | logs | restart
Panduan lengkap:     https://ocularvms.my.id/panduan
Info login ini juga disimpan di /opt/ocularvms/LOGIN-AWAL.txt
Installer messages are in Indonesian. "Alamat" is the address to open; the password is randomly generated for each installation.
The same details are saved in /opt/ocularvms/LOGIN-AWAL.txt and can be shown again with sudo ocularvms login-info. Delete that file after changing the password.
Installer options
Options go after bash -s --, for example curl -fsSL https://ocularvms.my.id/install.sh | sudo bash -s -- --port 9000
--port 9000 | A web port other than 8080, if 8080 is already in use. |
|---|---|
--dir /srv/ocular | An installation folder other than /opt/ocularvms. |
--yes | Do not ask questions; install Docker automatically if it is missing. |
Server commands
sudo ocularvms status | Status of all application services. |
|---|---|
sudo ocularvms update | Update to the latest version. |
sudo ocularvms logs api | The last 100 log lines; other services: worker, stream, web. |
sudo ocularvms restart | Restart the application. |
The application starts automatically whenever the server reboots.
4. Installing on Windows
On Windows, Ocular VMS runs inside WSL2 (Windows' built-in Linux environment) without Docker Desktop. Windows 11 version 22H2 or later (recommended) or Windows 10 version 22H2 is required, along with Administrator rights.
- Right-click the Start button and choose Terminal or Windows PowerShell.
- Run this command:
PS> irm https://ocularvms.my.id/install.ps1 | iex - Click Yes when Windows asks for Administrator permission. Installation continues in a new window.
- If WSL is not installed yet, the installer installs it and asks for a restart. Restart, then run the same command again.
- The installer sets up a dedicated Ubuntu for Ocular VMS, enables networking so other computers on the LAN can open the application, opens the firewall port, and installs the application. The address and initial sign-in are shown at the end.
For a web port other than 8080, run $env:OCULAR_PORT = 9000 first in the same window.
Windows 10
The installation command is the same. Because WSL on Windows 10 does not support "mirrored" networking, the installer creates a port forward from Windows port 8080 to the application and refreshes it every time Windows starts. Limitations:
- Hikvision device discovery (SADP) is not available; add NVRs and cameras by IP, or with the IP scanner.
- Microsoft has ended support for Windows 10 (no security updates). For long-term use, choose Windows 11 or a Linux server.
5. First sign-in
- From any computer on the same network, open the address shown by the installer in a browser, for example
http://192.168.1.10:8080. - Sign in with username
adminand the password from the installer. - Change the password: Settings, My account tab, Change password. Do this after activating the license, as Settings is locked until a license is active.
For staff who only need to watch, create a View only account under Settings, Users tab.
6. License activation
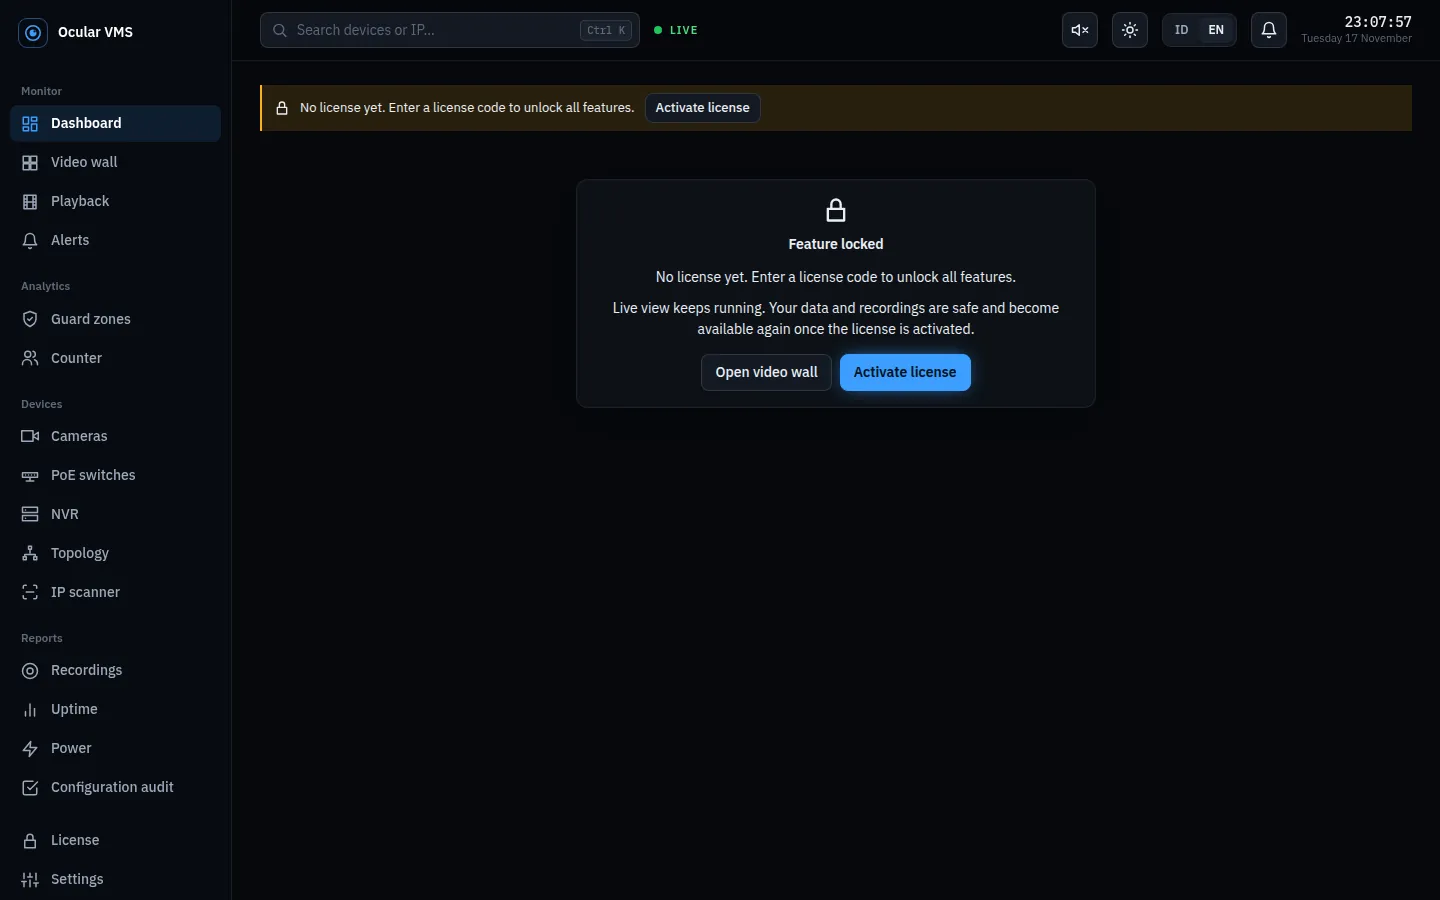
Without an active license only the video wall and the License page are available. Open License at the bottom of the left menu.
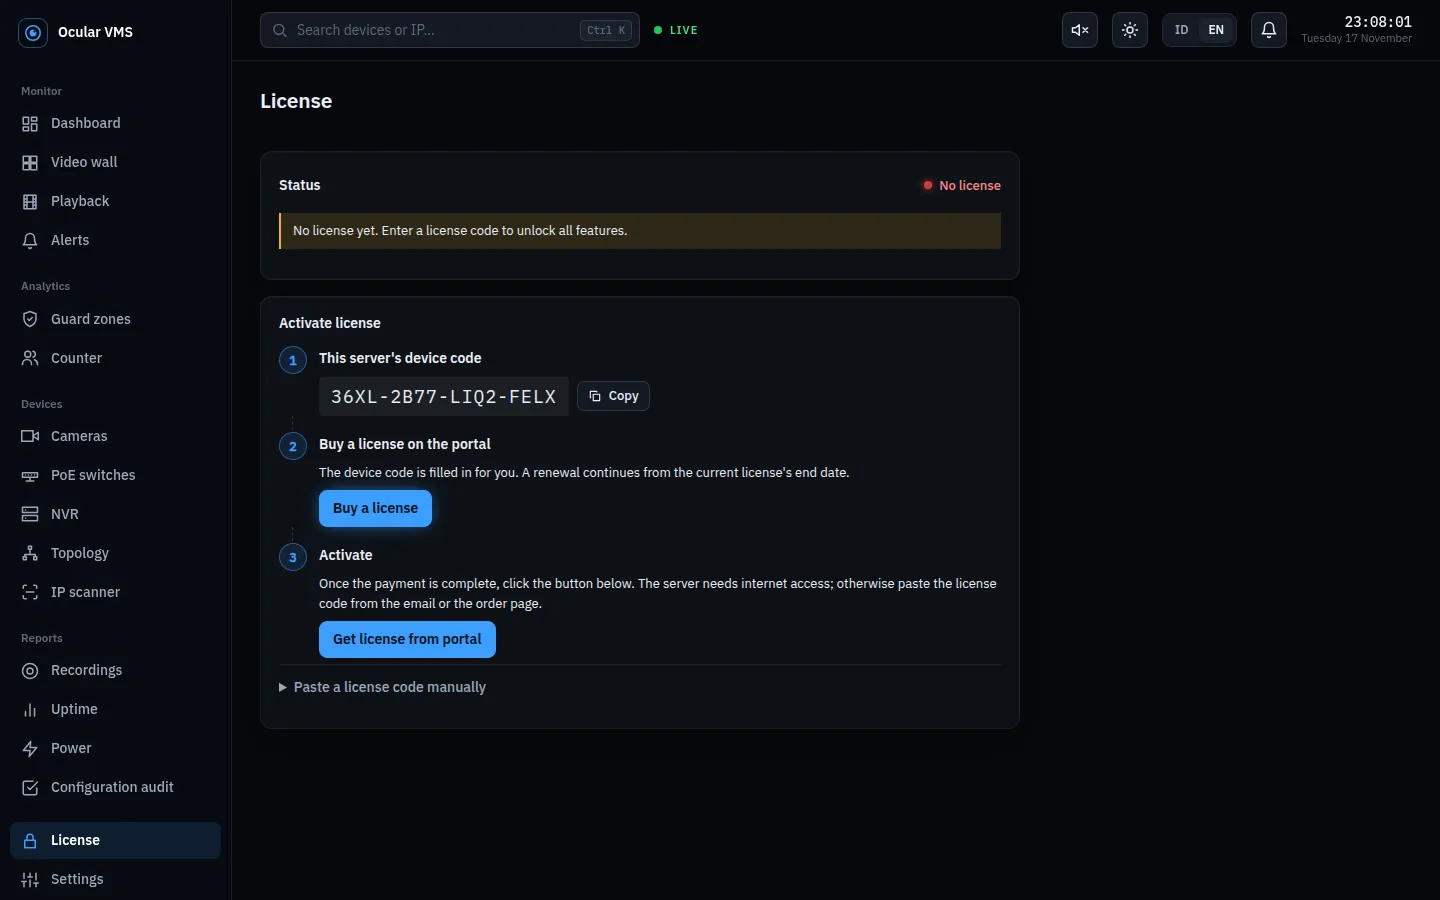
- The device code identifies this server. A license only works on the server with that code.
- Click Buy a license. The purchase page opens with the device code filled in. Choose a plan and enter your name, phone number, and email. Enter the verification code sent to your email, then pay. Temporary email addresses are not accepted.
- Once paid, the order page shows the license code. The same code is emailed to you and kept in your customer account.
- Back in the application, click Get license from portal. The license is active immediately.
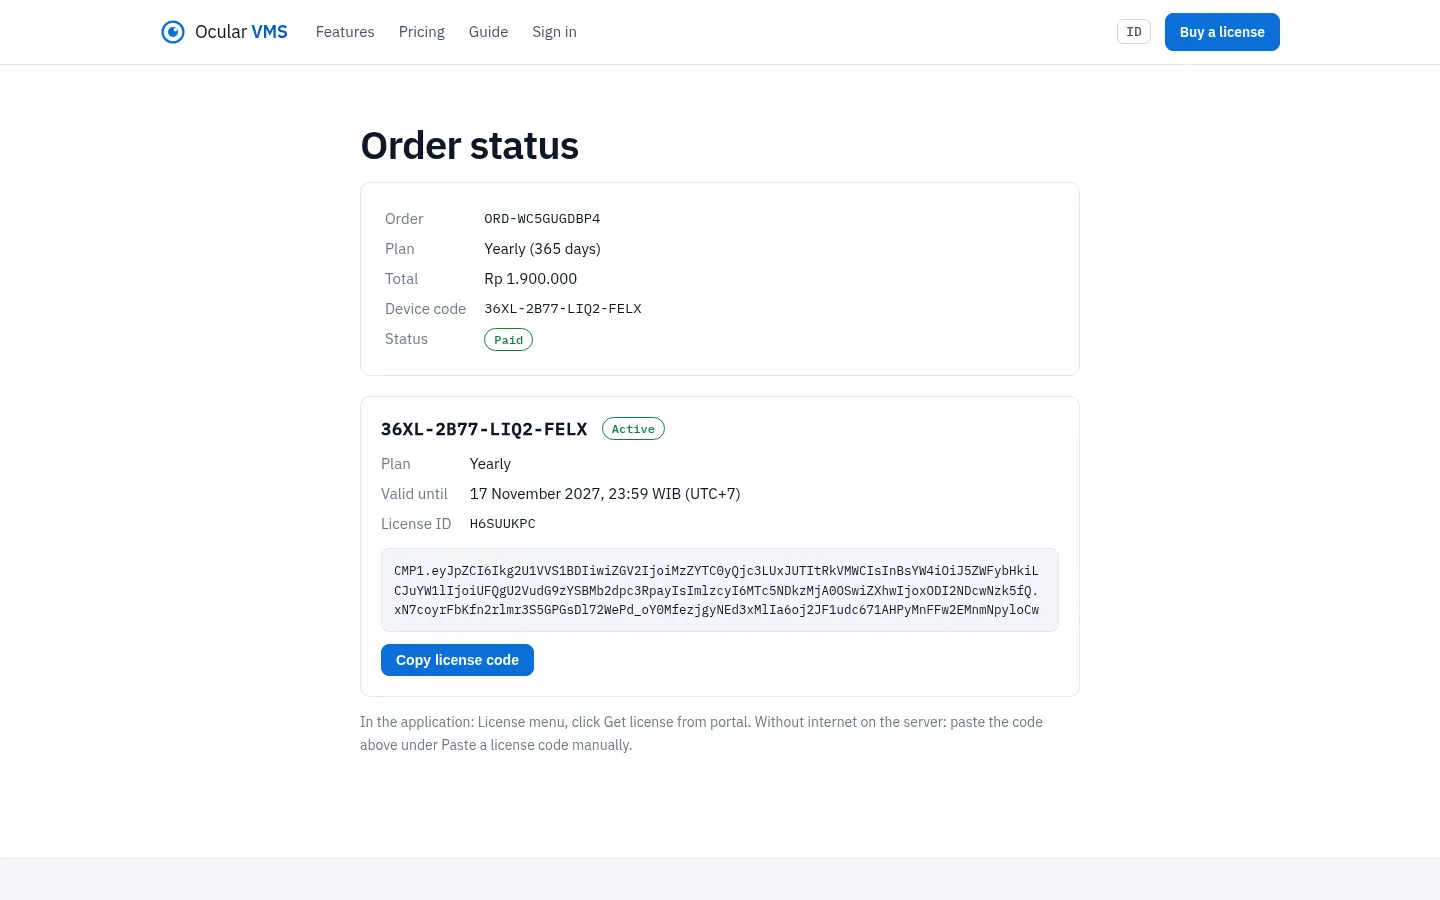
Servers without internet: open the purchase page from another computer, then in the application choose Paste a license code manually and paste the code from the email or order page.
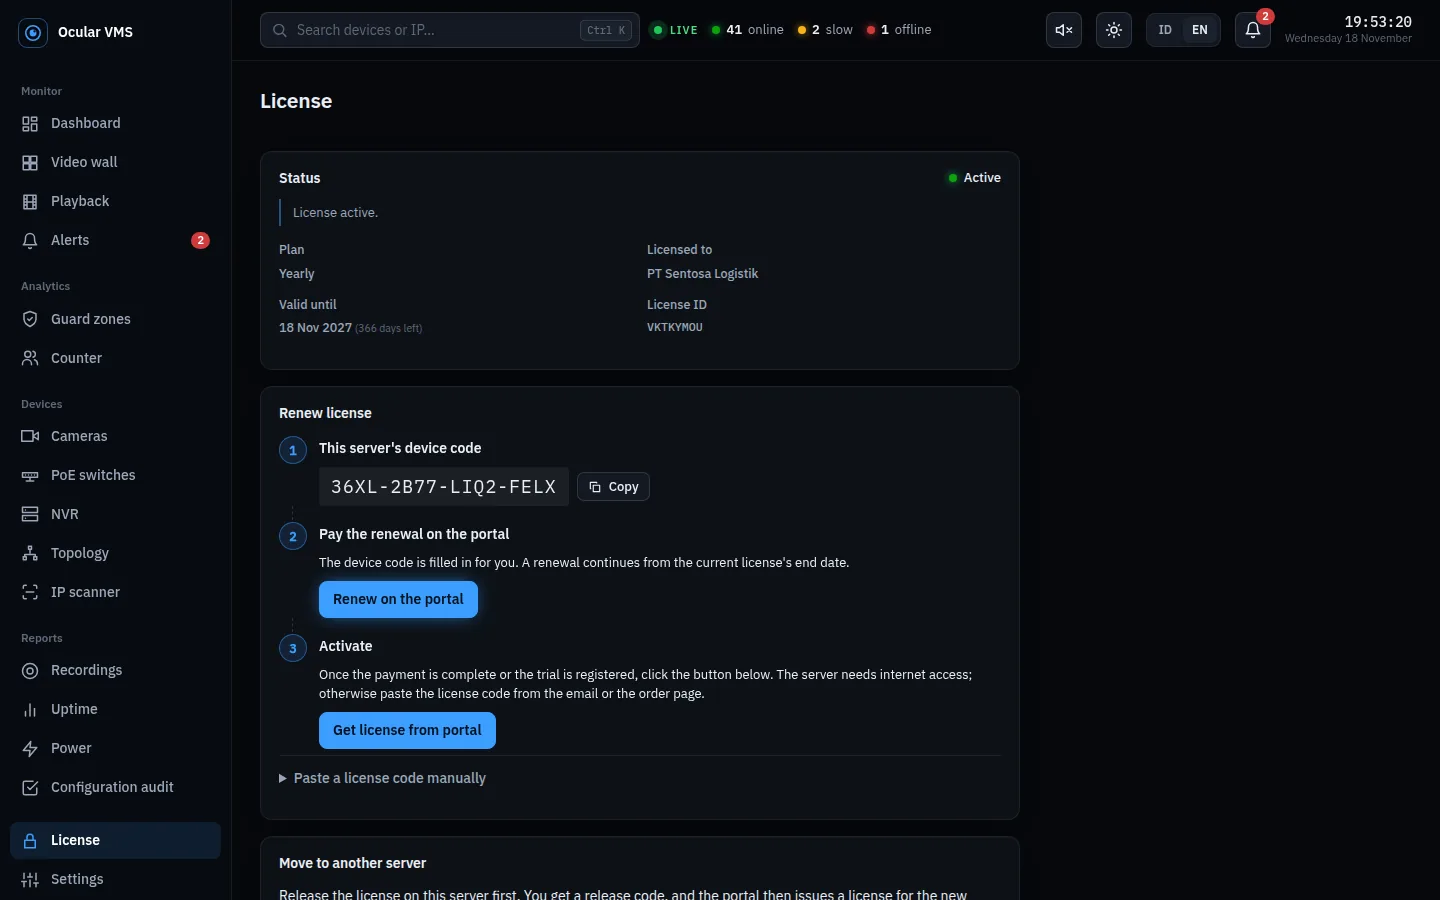
Renewing works the same way: click Renew on the portal. The new period continues from the current end date, so renewing early loses no days.
All licenses and purchases are listed in your customer account; sign in with the buyer's email.
7. Adding NVRs and cameras
Recommended order for a new installation:
- Locations. Settings, Locations & racks tab: create a site (for example "Warehouse"), areas within it ("Loading Dock"), and racks.
- PoE switches (optional, for port mapping). PoE switches menu, Add switch: enter the IP and SNMP community and click SNMP check. Name, model, and port count are read from the switch.
- NVRs. NVR menu, Add NVR: enter the name, IP, username, and password, then Connect & save. The connection is tested right away.
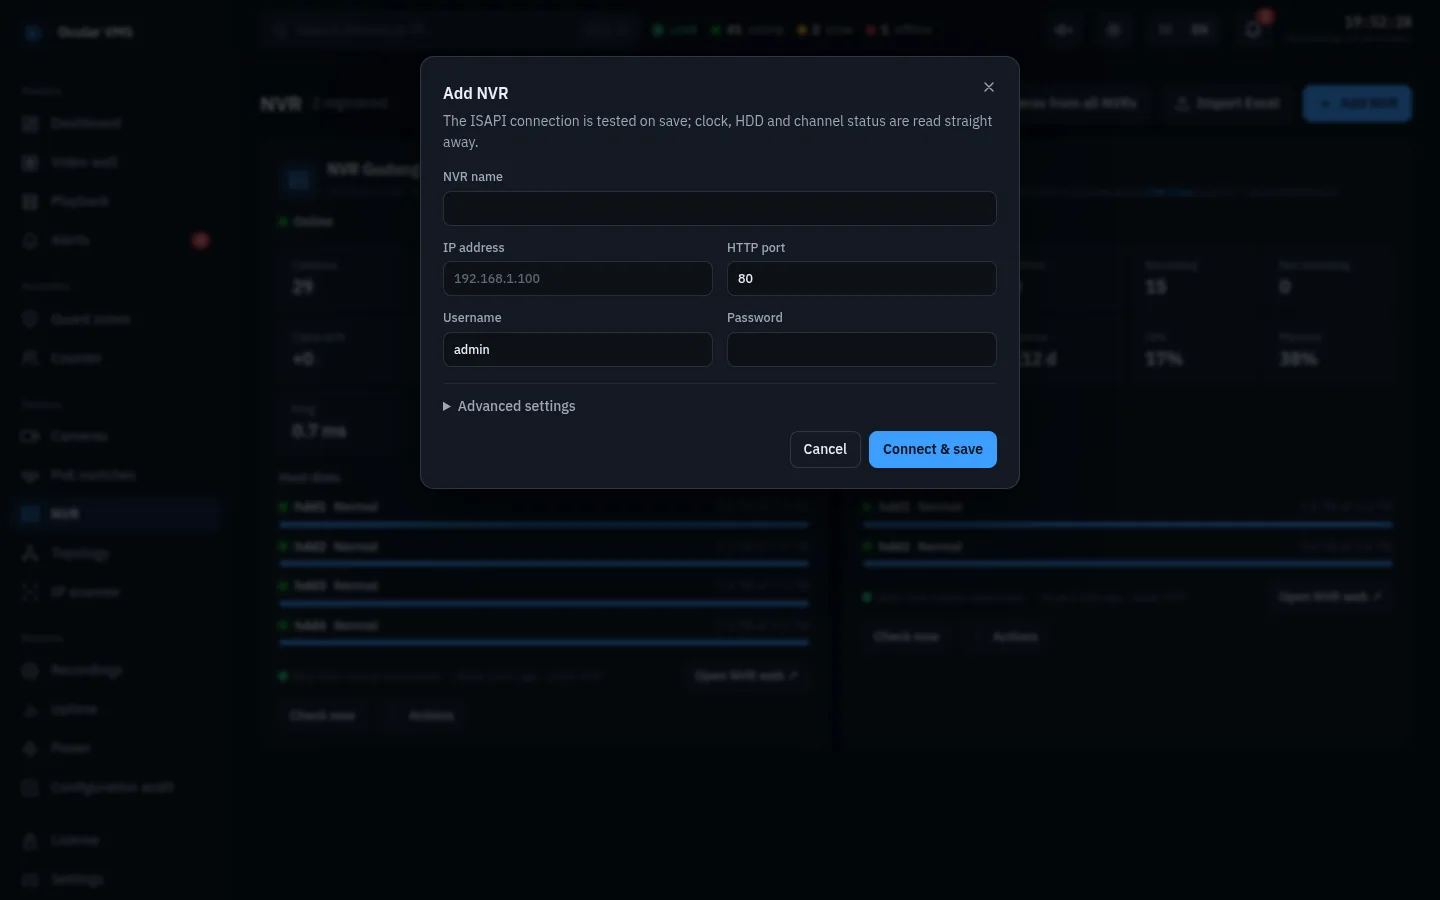
- Cameras. On the NVR card, click Actions, Import / sync cameras. Every NVR channel becomes a camera. The Sync cameras from all NVRs button does this for every NVR at once.
- Complete camera locations: area, category, switch, and port. For many cameras, select several in the list and edit them together, or import from Excel.
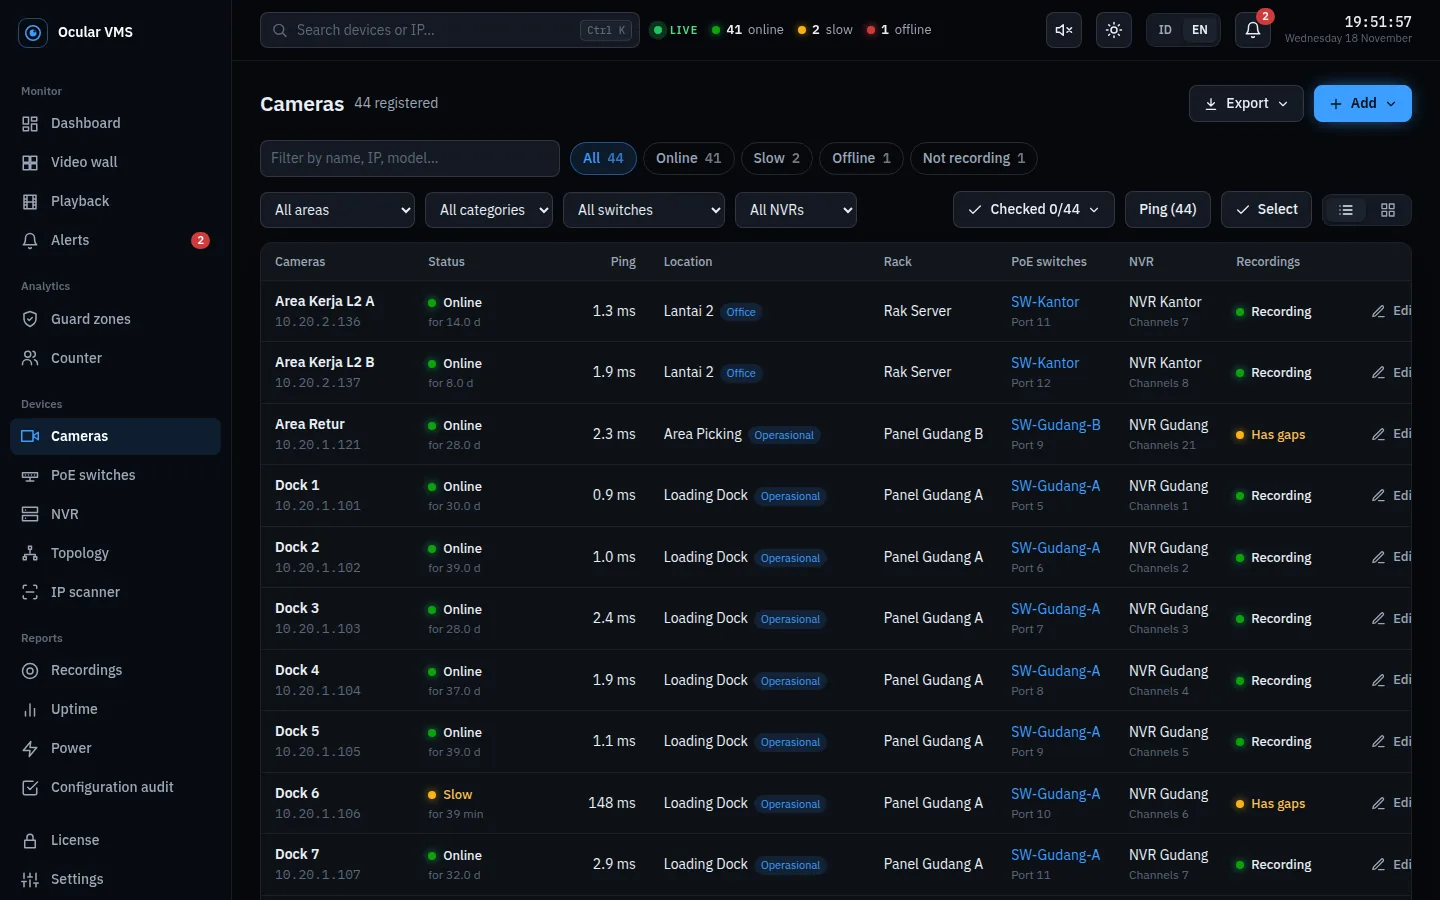
The first statuses appear within one to two minutes. The first recording check runs within 15 minutes.
Full steps for adding switches (SNMP v2c/v3 or without SNMP), NVRs, and cameras, and how to use every menu, are in the user guide.
8. Telegram notifications
Alerts can be sent to your team's Telegram group. The server needs internet access.
- In Telegram, open @BotFather, send
/newbot, follow the steps, and note the bot token. - Create a group for the team, add the bot, and send any message in the group.
- Open
https://api.telegram.org/bot<TOKEN>/getUpdatesin a browser. Note the number in"chat":{"id": …}; for groups it usually starts with a minus sign. - On the server, edit the configuration file and fill in these two lines:
$ sudo nano /opt/ocularvms/.env
TELEGRAM_BOT_TOKEN=123456789:AA...
TELEGRAM_CHAT_ID=-1001234567890
$ sudo ocularvms start
To test, unplug one camera for 2 minutes. A "Camera … offline" message arrives in the group, followed by another when it comes back online.
9. When the license expires
- 30 days before expiry: a reminder appears at the top of every page.
- After expiry: every feature keeps working during a 7-day grace period.
- After the grace period: restricted mode. The video wall keeps running; other menus show the screen below; Telegram notifications stop. No data is deleted and monitoring keeps recording in the background.
10. Moving to another server
- On the old server: Settings, Backup, Download backup (set a password so device passwords are included).
- On the old server: License menu, Release license from this server. The old server switches to restricted mode and shows a release code.
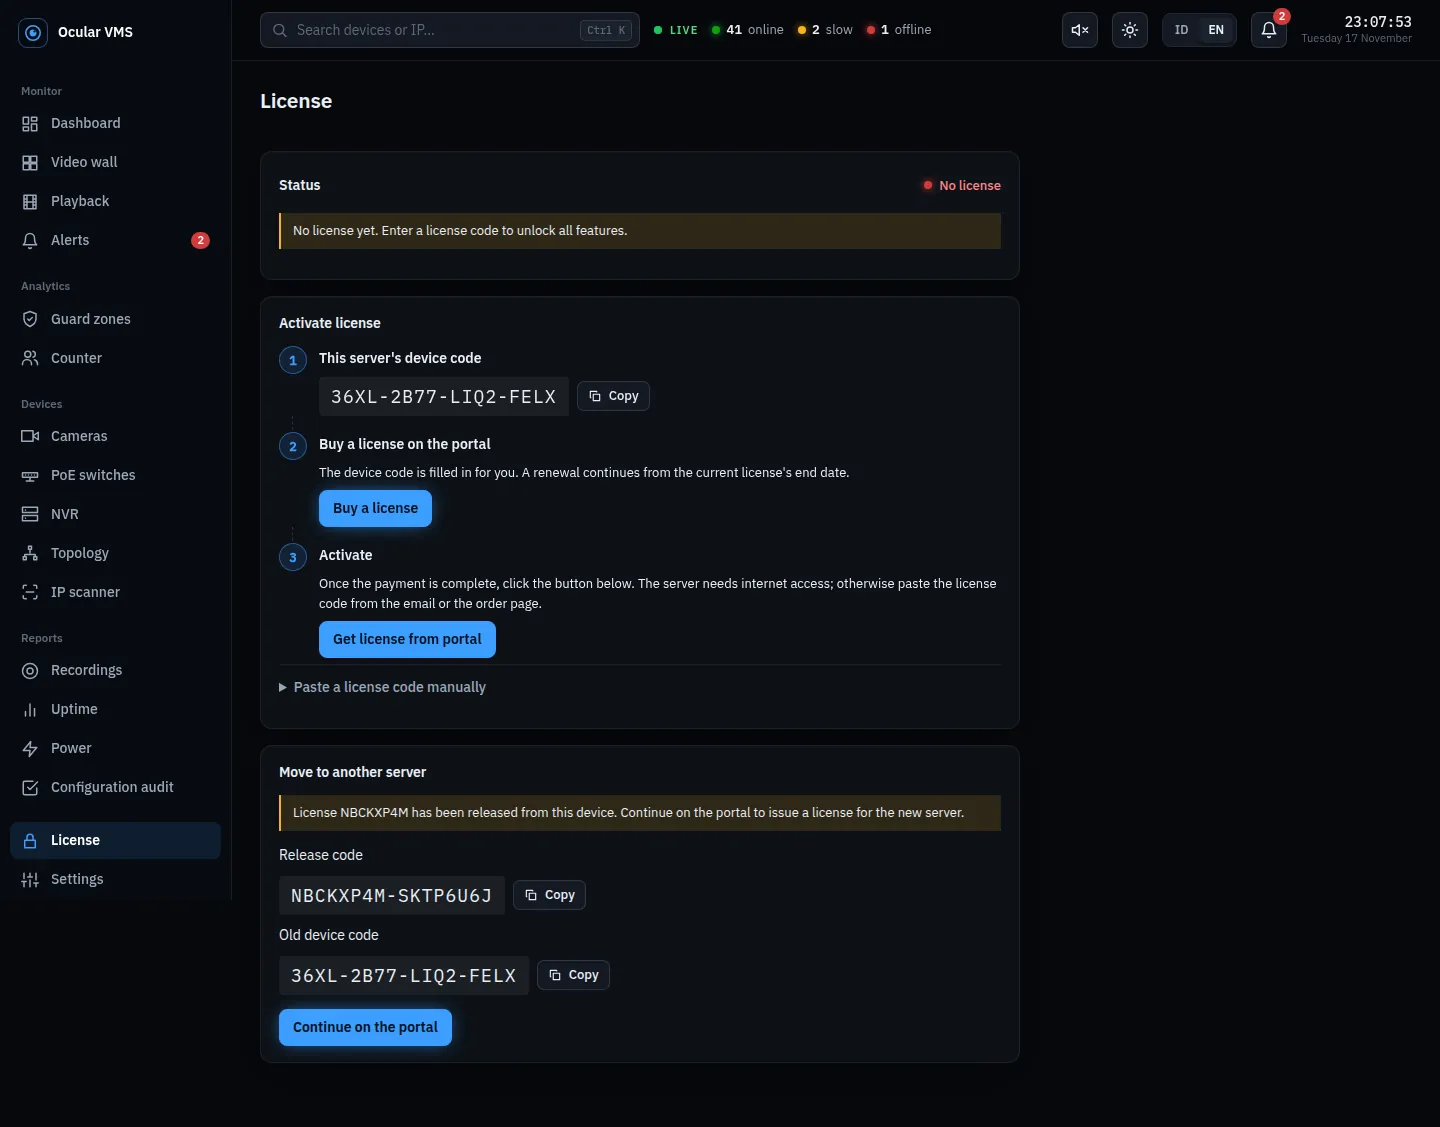
- Install Ocular VMS on the new server (section 3 or 4) and copy its device code.
- On the old server, click Continue on the portal. The transfer page opens with the old codes filled in; enter the new device code and the buyer's email.
- On the new server: Get license from portal, then restore the backup under Settings, Backup, Restore from file.
The full remaining time moves to the new server. Servers can be moved up to 3 times a year.
The old server is broken or lost
If the old server cannot be started, no release code can be created. Move the license from your account instead:
- Sign in to the customer account with the buyer's email.
- On the old server's license card, click Move server, then tick The old server is broken or lost.
- Enter the new server's device code and click Move license. On the new server: Get license from portal.
This is available once a year. Restore the latest backup as usual if you have one; without a backup, add the NVRs and cameras again.
11. Updating
Updates are included while the license is active. On a Linux server, run:
$ sudo ocularvms update
Data, settings, and the license are kept. The new version is downloaded first; if the download fails, the application keeps running on the old version. If the database structure changes, the application takes a backup before updating.
On Windows, run the installation command irm https://ocularvms.my.id/install.ps1 | iex again. If the application is already installed, it is updated.
12. Backup and restore
A backup is created automatically every day around 02:00 and stored on the server. Keep a copy elsewhere regularly via Settings, Backup, Download backup.
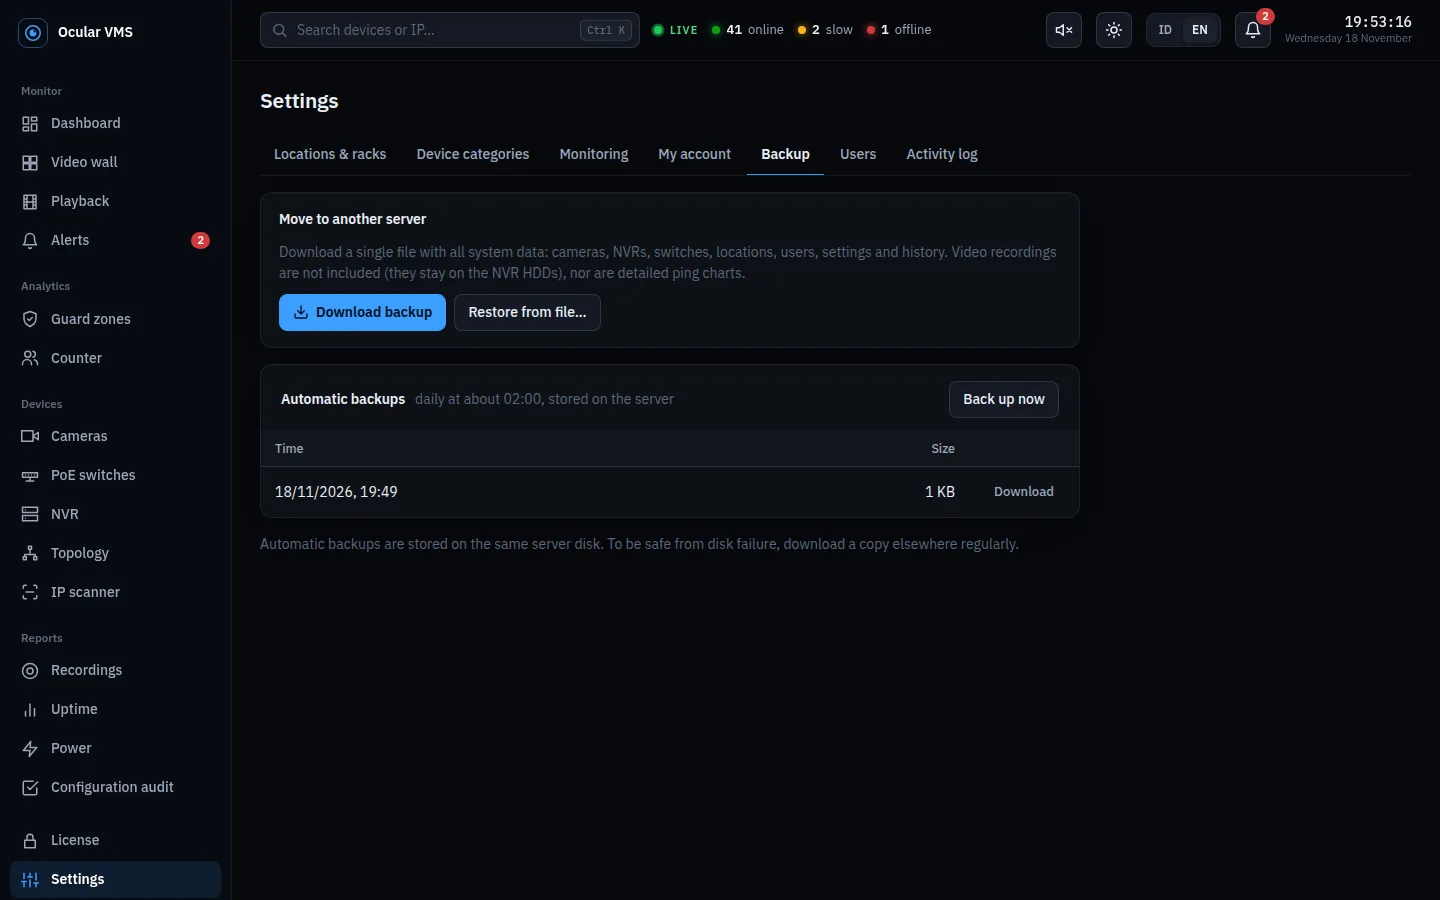
A backup contains cameras, NVRs, switches, locations, users, settings, and status history. Video footage is not included because it stays on the NVRs. Restoring replaces all data, but the license active on this server is kept.
13. HTTPS
By default the application is served over HTTP on the local network. For HTTPS, place the certificate at /opt/ocularvms/certs/server.crt and server.key, append :docker-compose.tls.yml to the COMPOSE_FILE line in /opt/ocularvms/.env, and run sudo ocularvms start. HTTPS is served on port 8443.
14. Troubleshooting
| The page does not open from other computers | Check the address and port, and that the server firewall allows port 8080 (Ubuntu: sudo ufw allow 8080/tcp). |
|---|---|
| All cameras are offline | The server cannot reach the camera network. Try ping to a camera IP from the server. If cameras are on another VLAN, make sure there is a route to it. |
| NVR: wrong username or password (401) | Check the NVR account. After several failures a Hikvision NVR locks the account temporarily; wait before trying again. |
| Get license from portal fails | The server has no internet access. Paste the license code manually from the email or the customer account. |
| Server clock went backwards | The application enters restricted mode when the server clock goes backwards. Enable time sync: sudo timedatectl set-ntp true. |
| Viewing logs | sudo ocularvms logs api |
15. Getting help
Support covers usage questions, license activation and transfer, and application issues, on working days. Include the device code or order number, and a screenshot of any error message.
WhatsApp +62 851-5886-9026
Email support@ocularvms.my.id