Guide · version 1.0
Ocular VMS user guide
How to use every menu, from adding NVRs and switches to reading reports. To install the application and activate a license, see the installation guide.
1. About Ocular VMS
Ocular VMS monitors Hikvision cameras, NVRs, and PoE switches from one screen. Footage stays on the NVRs; Ocular VMS reads it, checks it, and displays it.
| Question | How Ocular VMS answers it |
|---|---|
| Which cameras are down? | Every camera is pinged every 30 seconds; three missed checks in a row mark it offline. |
| Which cameras have a poor network? | High ping or packet loss is marked Slow. |
| Is each camera actually recording? | The NVR is asked directly over ISAPI every 15 minutes. |
| What was the dead camera watching? | The last image before it went down is kept and shown. |
| Is the switch the problem? | When every camera on one switch goes down at once, the switch is reported. |
| How long is footage kept? | The oldest recording and recorded days are read from the NVR daily. |
| Was a camera covered, or is a disk failing? | NVR events arrive as they happen; disk health (SMART) is read daily. |
Menu
| Group | Menu |
|---|---|
| Monitor | Dashboard, Video wall, Playback, Alerts |
| Analytics | Guard zones, Counter (people and vehicle counting) |
| Devices | Cameras, PoE switches, NVR, your own device categories, Topology, IP scanner |
| Reports | Recordings, Uptime, Power, Configuration audit |
| Bottom | License, Settings |
The top bar holds search (Ctrl+K from any page), the online/slow/offline counts, the alert sound toggle, light/dark theme, ID/EN language, and the alert bell. Theme, language, and sound are remembered per browser.
There are two user roles: Admin (everything) and View only (every page, video, and Excel export, but no changes and no device actions).
2. Getting started
On a new installation, enter data in this order:
- Locations. Settings, Locations & racks tab: add a site (e.g. "Cikarang Warehouse"), areas inside it (e.g. "Loading Dock"), and racks.
- PoE switches. Over SNMP if the switch supports it, or manually. See section 6.
- NVRs. Enter the IP, username, and password. See section 5.
- Import cameras from each NVR. Every NVR channel becomes a camera in one click.
- Complete camera locations: area, rack, switch, and port. For many cameras, use Excel import or let SNMP automatic mapping fill in the ports.
- Turn on alert sound (speaker icon in the top bar) on the control room computer, and set up Telegram if needed (installation guide).
Monitoring then runs on its own. The first statuses appear within a minute or two.
3. Status meanings
Device status
| Status | Meaning |
|---|---|
| Online | Answers ping normally. |
| Slow | Answers, but average ping is above 100 ms or packet loss is above 20%. Usually a cable, connector, or congested network. |
| Offline | No ping reply for 3 checks in a row (about 90 seconds). |
| Not checked | Just added, or has no IP. |
All thresholds can be changed under Settings, Monitoring.
Camera status source
Cameras plugged into the NVR's built-in PoE ports sit on the NVR's internal network and cannot be pinged from the server. For those cameras, set the status source to NVR channel: open the camera, Edit, Advanced settings, Status source. Status then comes from the NVR (updated every 15 minutes, without Slow status or latency charts).
Recording status
| Status | Meaning |
|---|---|
| Recording | The latest recording is recent and today has no large gap. |
| Has gaps | Still recording, but today has a gap longer than 10 minutes. |
| Not recording | No recording at all, or the latest one is older than 30 minutes. |
| NVR unreachable / Check failed | The NVR cannot be reached, or the recording search for this camera failed. |
Manual ping
In camera details: Ping now (4 pings) and Continuous ping (one ping per second for 2 minutes, like ping -t, for a technician checking a cable). In the camera list, Ping (n) pings every camera shown. A successful manual ping restores status straight away; a failed one never marks a device offline.
Maintenance mode
Cameras in maintenance mode are still monitored but raise no alerts. Use it while a camera is switched off for repair.
4. Dashboard
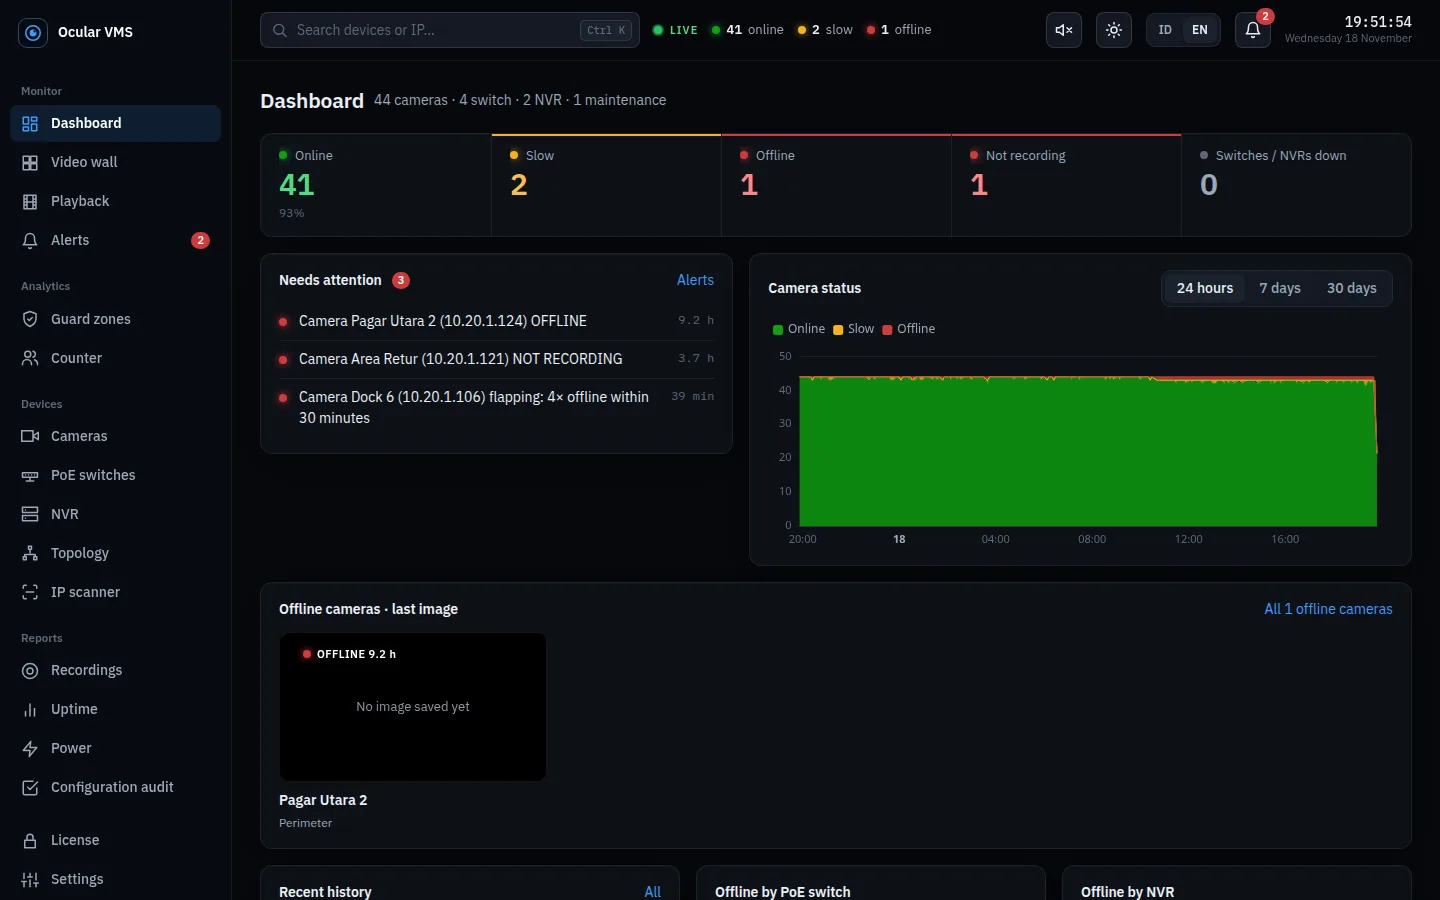
- Five counters: Online, Slow, Offline, Not recording, Switches/NVRs down. Click one to open the filtered list.
- Needs attention: active alerts nobody has picked up.
- Camera status: cameras per status over 24 hours, 7 days, or 30 days.
- Offline cameras, last image: the last image of each camera that went down, so its area is recognised at once.
- Recent history and offline by switch / by NVR: where problems cluster.
Everything refreshes every 30 seconds.
5. NVRs and camera import
Adding an NVR
- Open NVR and click Add NVR.
- Enter the NVR name, IP address, HTTP port (usually 80), Username, and Password. An admin or operator account with playback rights is enough.
- Click Connect & save. The ISAPI connection is tested right away; if it fails, the message says why (wrong password, wrong port, or unreachable).
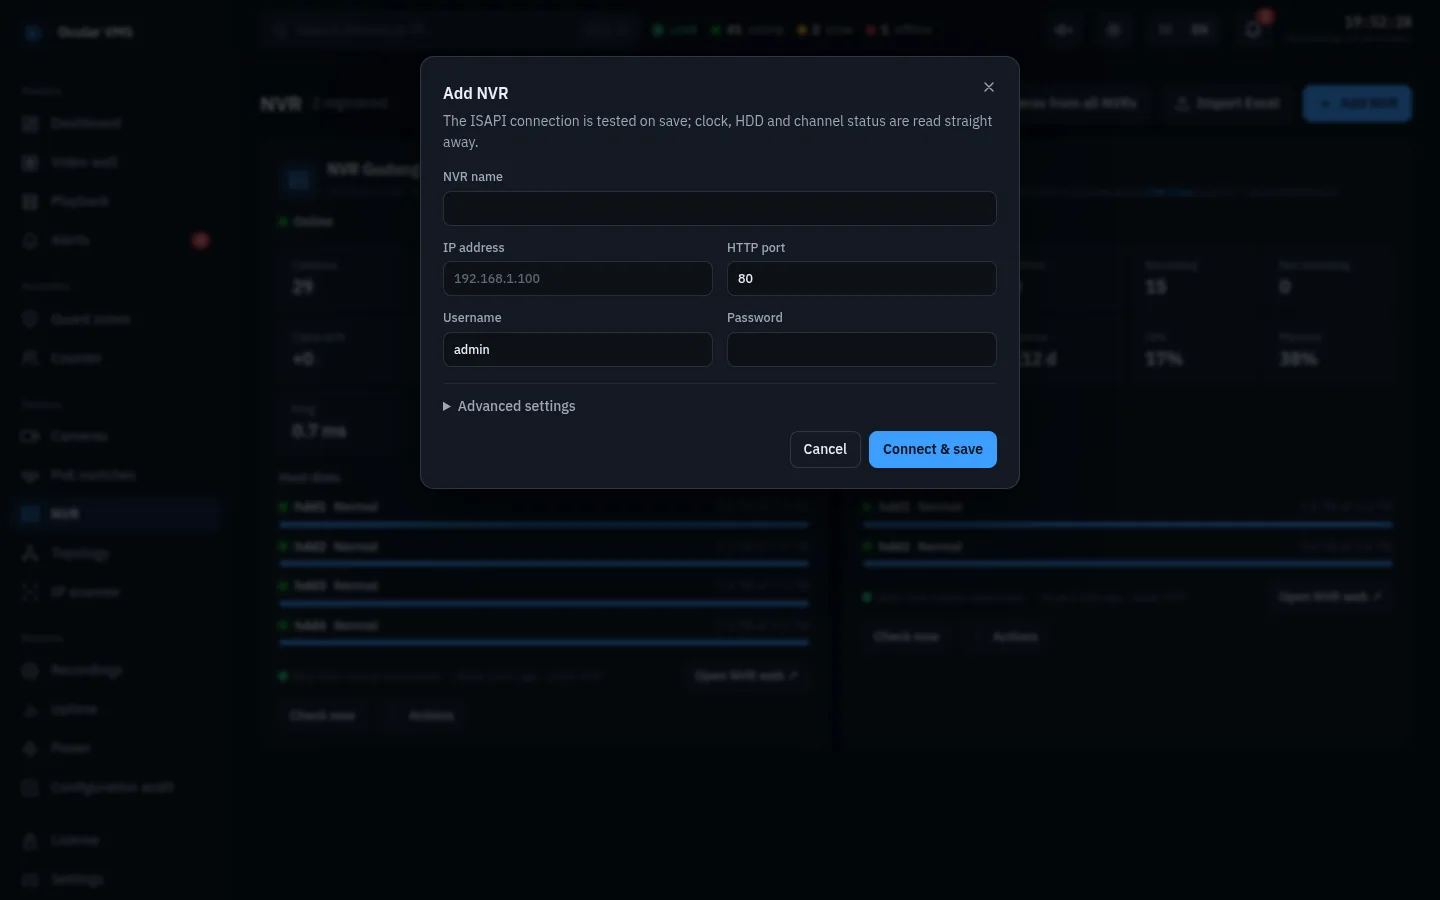
Advanced settings holds HTTPS, the RTSP port (usually read automatically), and the switch and port the NVR is plugged into.
Importing cameras from an NVR
On the NVR card, click Actions, then Import / sync cameras. Every channel becomes a camera; existing cameras get their name and IP updated, while locations you entered are kept. It is safe to run repeatedly. For every NVR at once, use Sync cameras from all NVRs at the top of the page.
The NVR card
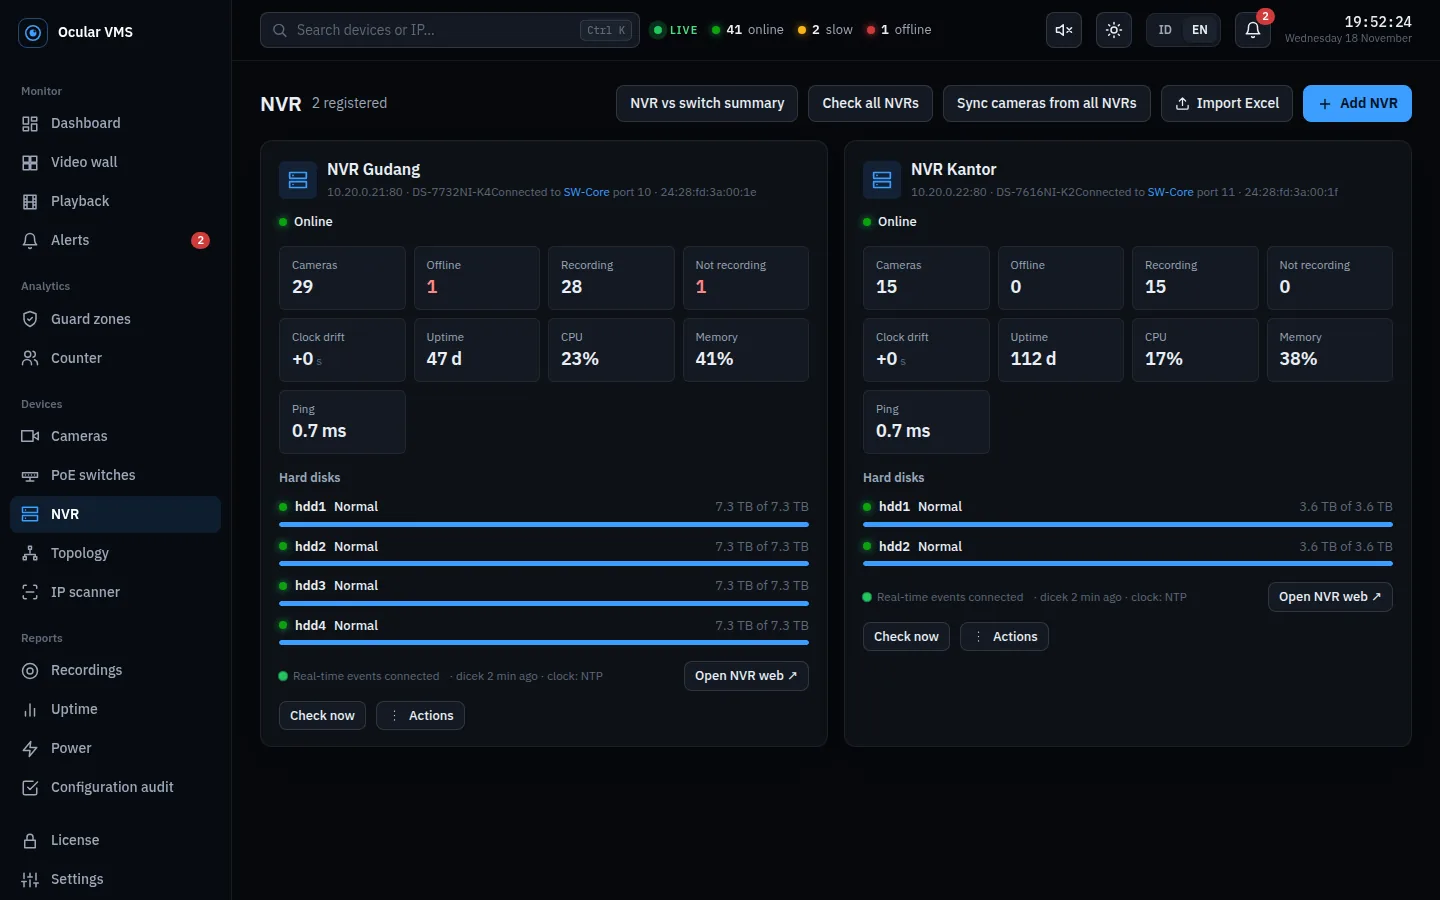
| Box | Meaning |
|---|---|
| Cameras, Offline, Recording, Not recording | Cameras on this NVR by their latest status. Click to open the list. |
| Clock drift | Difference between the NVR clock and the server clock. Red above 60 seconds, because a wrong clock makes footage hard to use as evidence. |
| Uptime, CPU, Memory, Ping | Time since the last restart, NVR load, and latency from the server. |
| Hard disks | Status, usage, and SMART for each disk: Healthy, Warning (prepare a replacement), or Failing (replace as soon as possible). |
NVR actions
| Action | What happens |
|---|---|
| Check now | Reads clock, disks, channel status, and NVR health immediately. |
| Read retention & configuration | Runs the daily read now (retention, SMART, stream settings). |
| Sync clock to server | Sets the NVR clock to the server clock. NTP on the NVR is turned off. |
| Restart NVR | Reboots the NVR. Recording on all its cameras stops for a few minutes. |
| Edit NVR | Name, IP, port, or account. Delete is here. |
Check all NVRs contacts every NVR at once and shows which are connected. Import Excel adds many NVRs from one file (columns name, ip, port, scheme, username, password, rack, switch, switch_port); tick Import cameras from each NVR to pull their cameras in the same step.
6. PoE switches (SNMP or manual)
Ocular VMS monitors switches in two ways. With SNMP (managed switches), the status of every port, PoE, errors, traffic, and connected devices is read, and camera ports can be filled in automatically. Without SNMP (unmanaged switches), the switch is monitored by ping and camera ports are entered by hand. The application only reads; switch settings are never changed.
Preparing SNMP on the switch
- In the switch web interface or CLI, enable read-only SNMP.
- Choose SNMP v3 when available, because it is encrypted. SNMP v2c sends the community unencrypted; if you use v2c, replace the default
publiccommunity with another word. - Make sure the Ocular VMS server can reach the switch on UDP port 161. Enable LLDP too if available, so links between switches are read accurately.
Adding a switch over SNMP
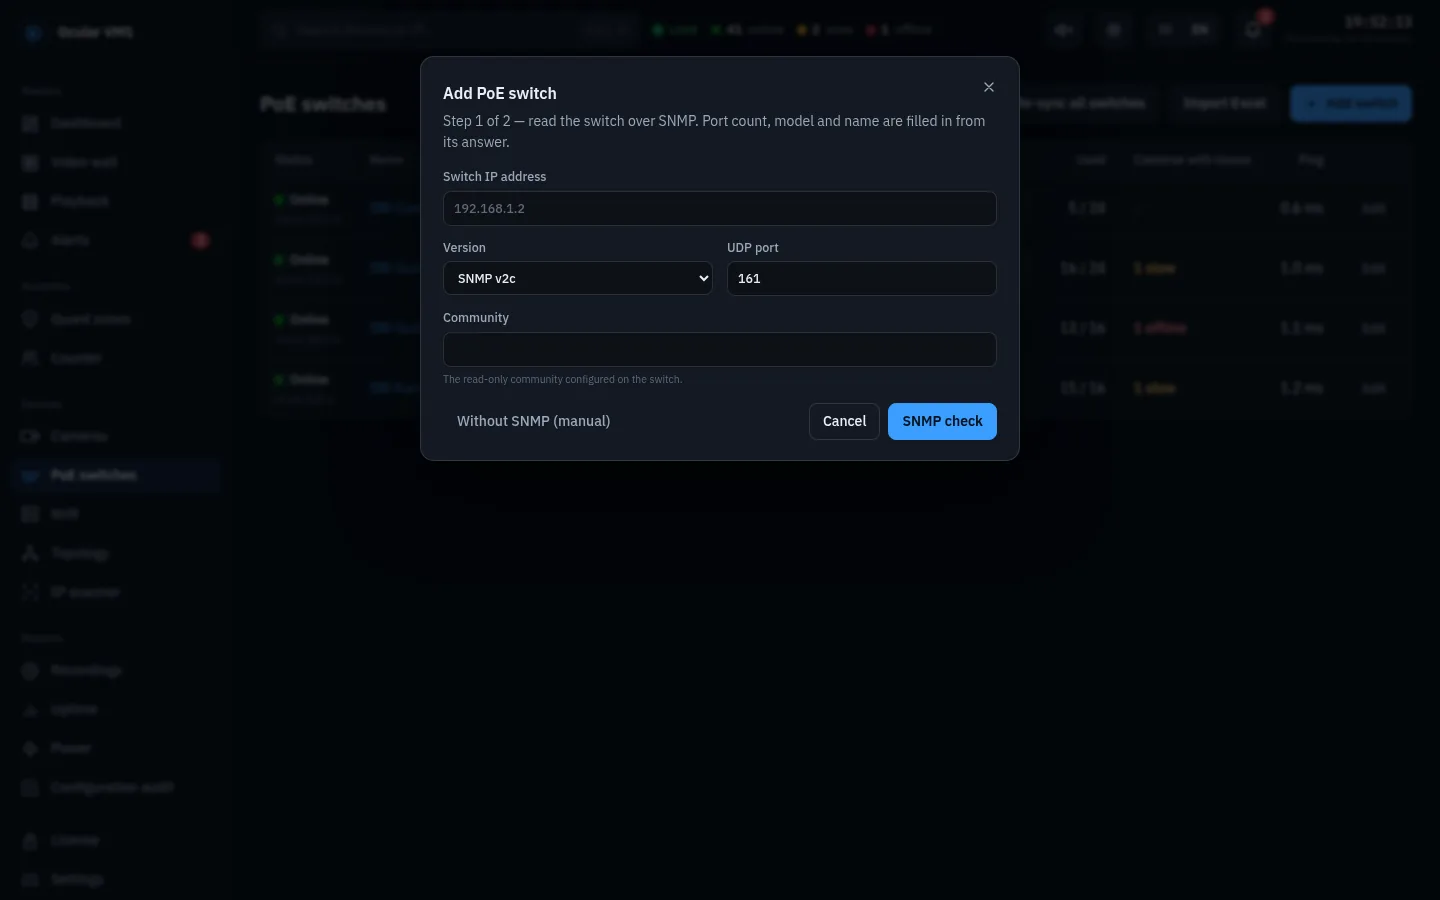
- Open PoE switches and click Add switch.
- Step 1: enter the switch IP address, SNMP Version, UDP port (161), then:
- v2c: the Community;
- v3: the Username, authentication protocol and key (SHA/MD5), and privacy protocol and key (AES/DES) as configured on the switch.
- Step 2: the application shows what it read (description, vendor, physical and PoE ports, PoE power, uptime) and fills in the name, model, and port count. Add the rack and uplink, then Save switch.
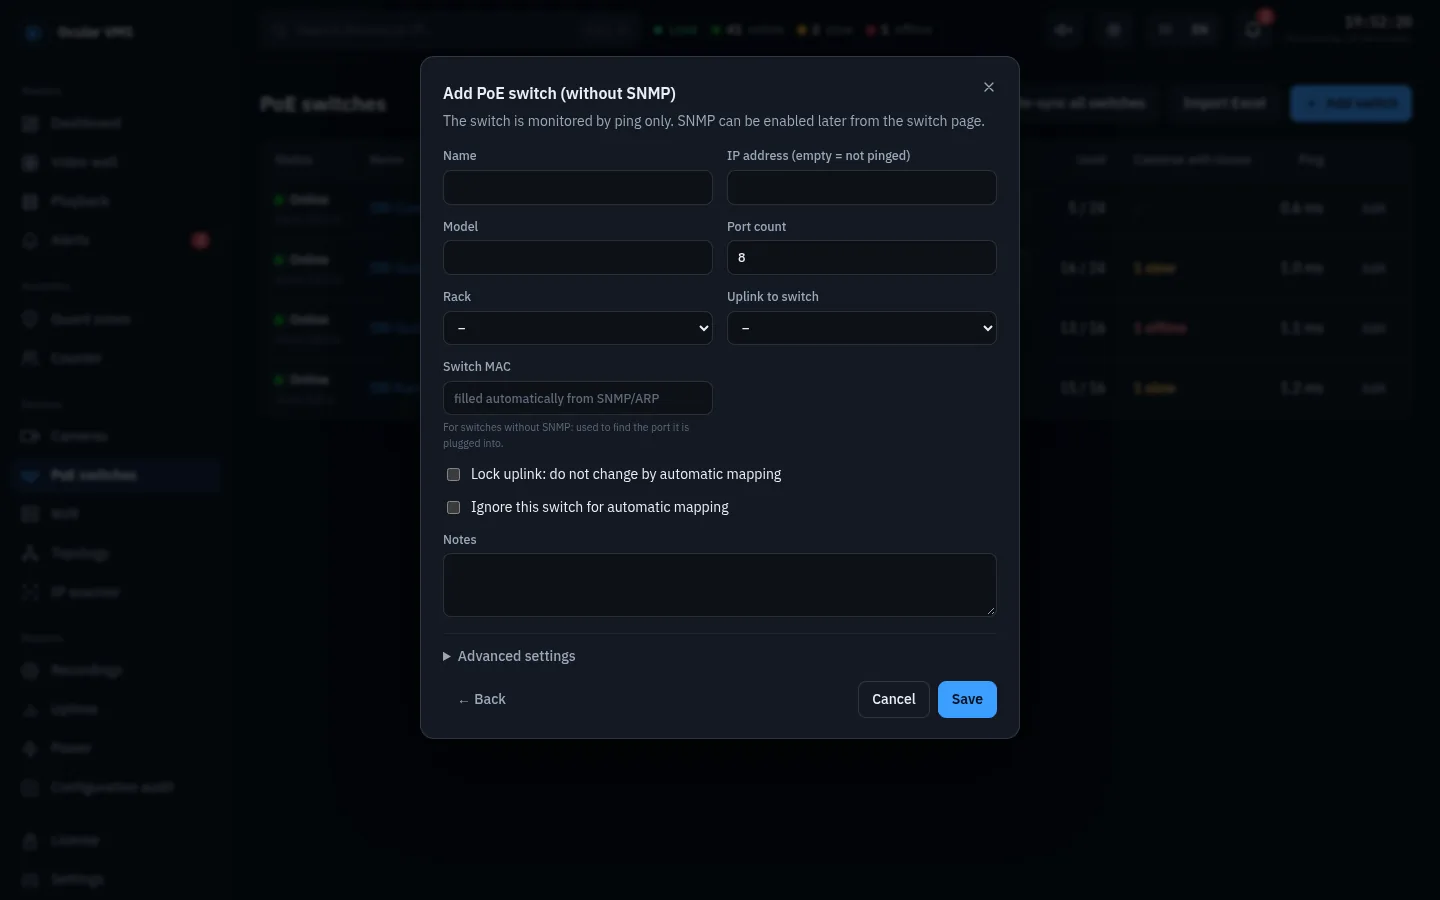
Adding a switch without SNMP (manual)
- In the Add switch form, click Without SNMP (manual).
- Enter the Name, IP (optional; a switch without an IP is not pinged), Model, Port count, Rack, and the Uplink switch and its port.
- Enter the Switch MAC if known: the port it is plugged into on an SNMP switch is then detected too.
- Click Save. SNMP can be enabled later from the switch page.
To enable SNMP on an existing switch: open the switch, SNMP card, Enable SNMP, enter the version and account, then Save & read.
The switch page
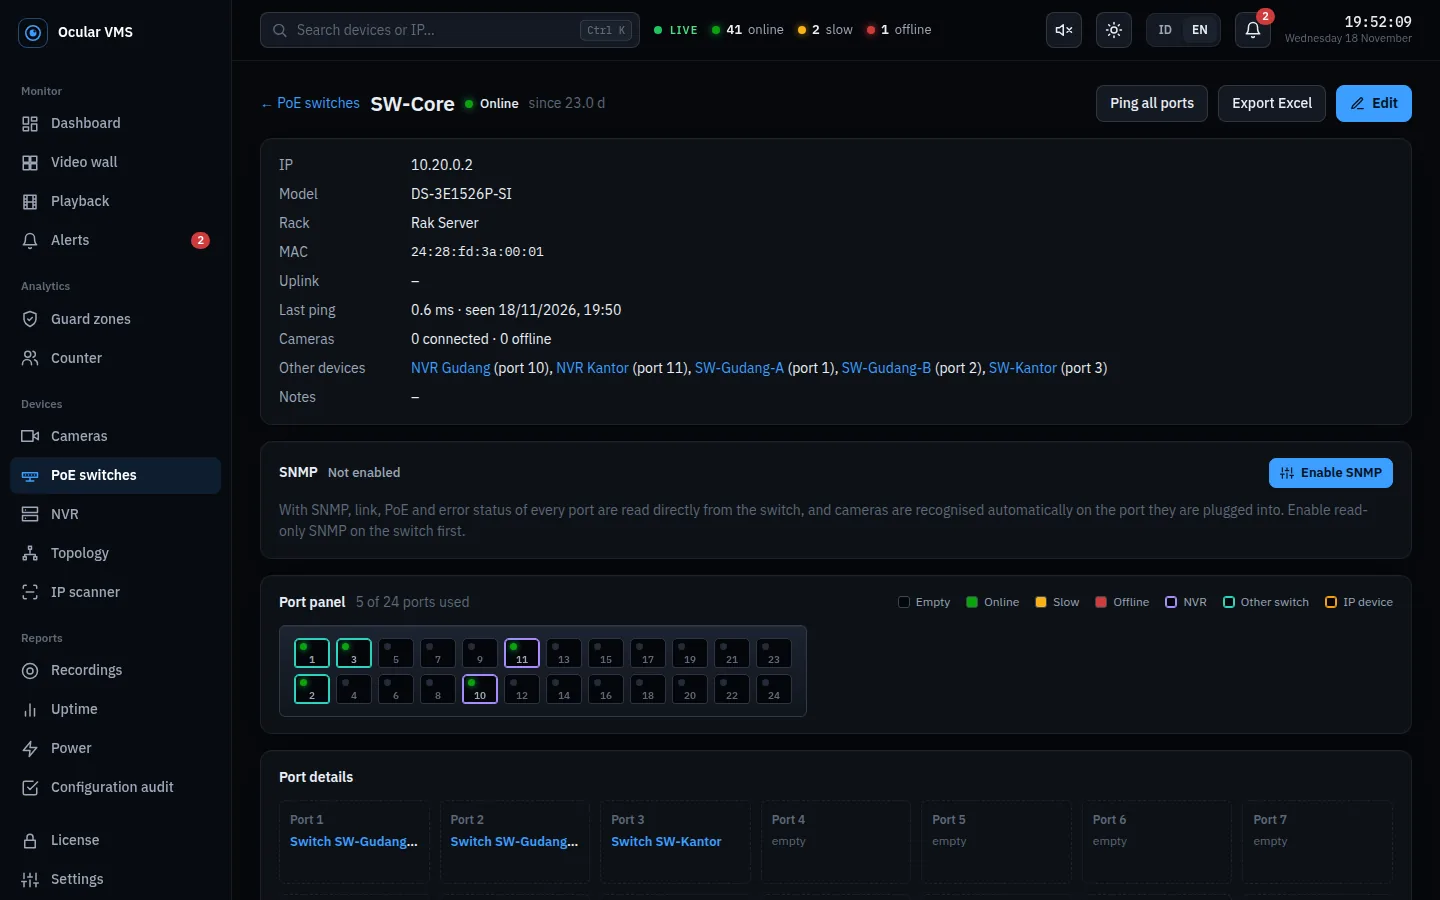
- Port panel: a drawing of the switch front panel. Each port light follows its camera: green online, yellow slow, red offline, dark empty. Hover to see the camera name; click to open it.
- With SNMP: a port table with link and speed, PoE, errors, traffic, link flaps, PoE class, and devices seen on each port; a switch health card (CPU, memory, temperature when available) and a total PoE power bar.
- Cameras whose link is up but whose traffic is close to zero are flagged, as they are probably not sending video.
- Ping all ports pings the switch and every device on its ports.
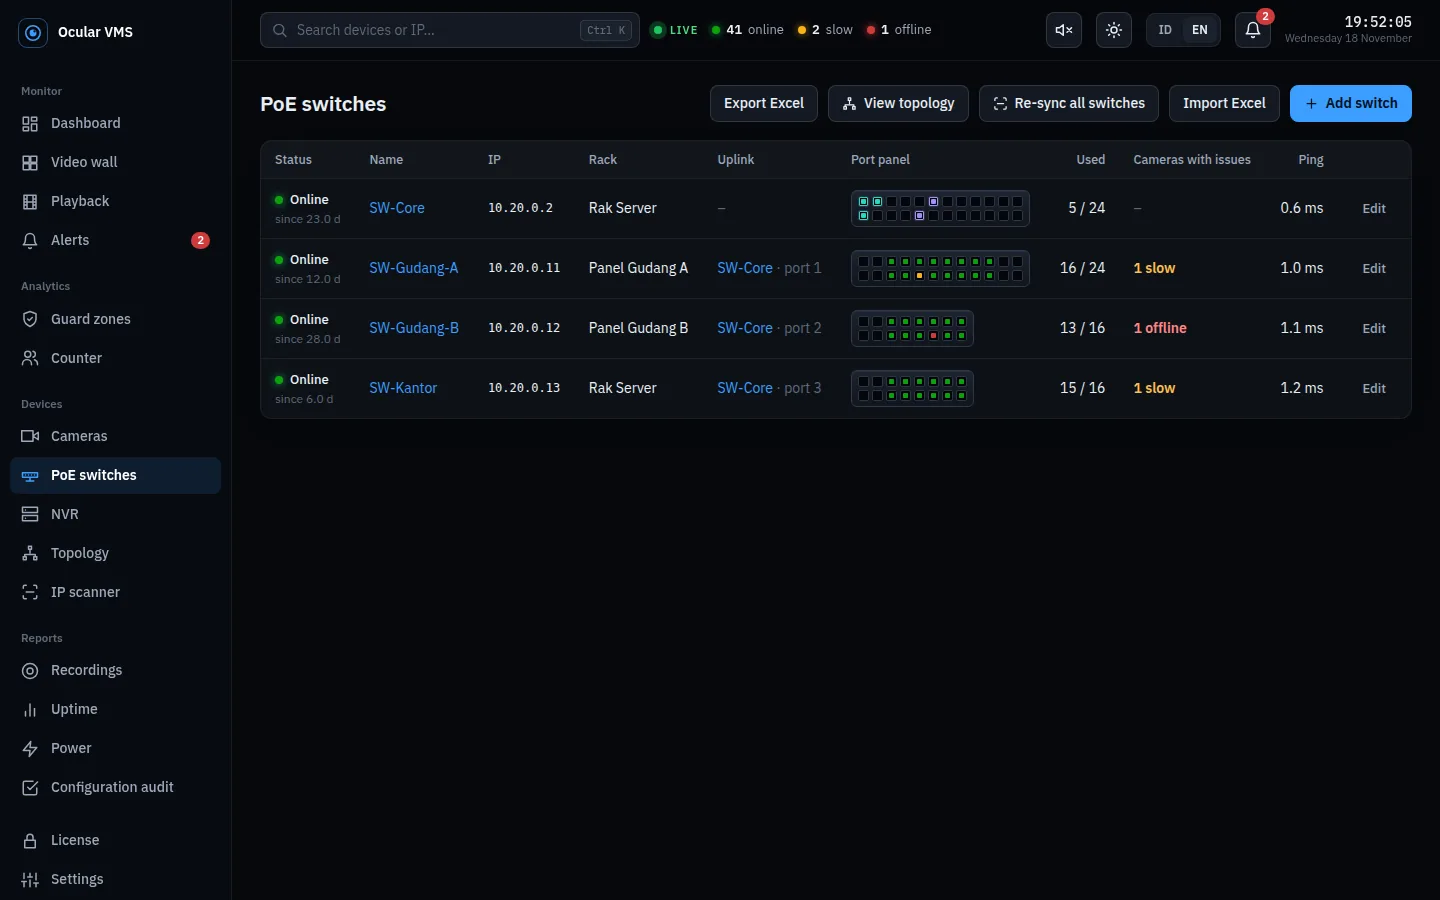
Assigning a camera to a port
From the camera: Edit, choose the PoE switch, then click the port on the panel drawing that appears. One port holds one camera, and the port number cannot exceed the switch's port count.
Automatic port mapping (SNMP)
On every SNMP read (every 2 minutes), the MAC and LLDP tables of all SNMP switches are matched against registered devices. Camera and NVR ports are filled from their MAC addresses, and links between switches from LLDP. Camera MACs must be known; they are filled automatically when a camera is added over ISAPI or the IP scanner, read using its NVR account, or taken from the ARP table of a layer-3 switch.
If a switch's readings cannot be trusted, there are three safeguards: Lock port in the camera form (automatic mapping never moves it), Lock uplink in the switch form, and Ignore this switch for automatic mapping. Re-sync all switches on the PoE switches page reads every switch immediately and lists each change.
Switch problem detection
| Situation | Alert |
|---|---|
| The switch does not answer ping | One switch-offline alert with the number of affected cameras. The cameras behind it raise no alerts of their own. |
| The switch is up but all its cameras are offline | One "switch suspected" alert: check the switch's power or uplink. |
| A camera port reports a PoE fault (SNMP) | A PoE fault alert for that camera. |
Import Excel adds many switches at once; only the ip column is required, the rest comes from SNMP. The SNMP account is entered once in the import form.
7. Cameras
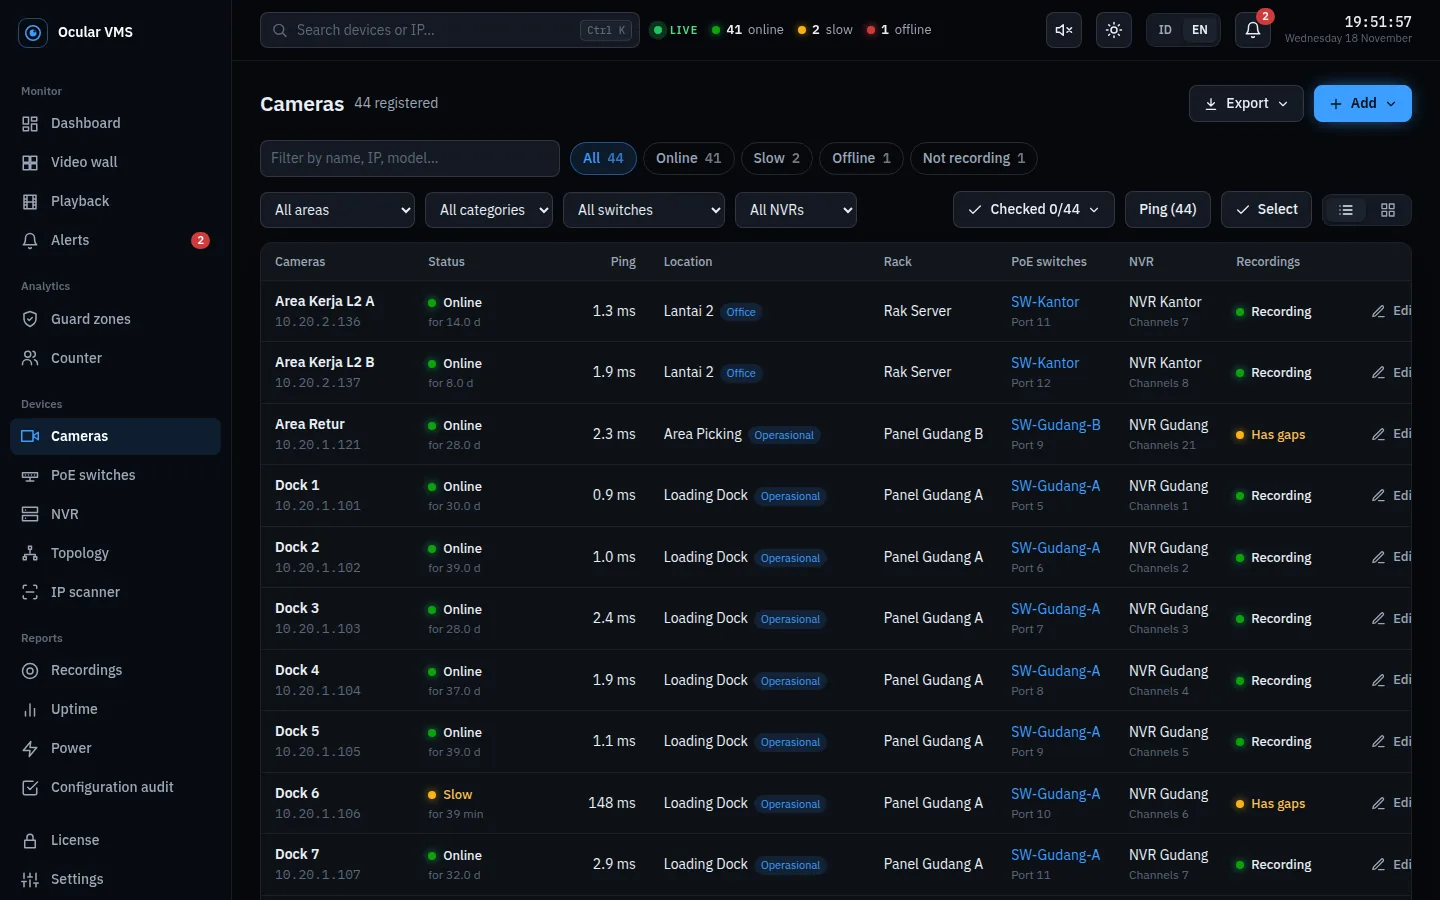
Above the list: search, status buttons (All, Online, Slow, Offline, Not recording), filters for area, category, switch, and NVR, plus Ping (n), Select for bulk changes, and list or image-grid view. Filters are kept in the page address, so they can be shared as a link.
Adding cameras
| Method | When to use it |
|---|---|
| Import from NVR | The cameras are already on an NVR. The fastest way (section 5). |
| Add, Via ISAPI | A standalone camera you have a login for. Model, serial, MAC, and firmware are read automatically. |
| Add, Manual | Ping monitoring only: name and IP. |
| Add, Import from Excel | Create or update many cameras at once (section 21). |
In the camera form, the Area, Rack, Category, and PoE switch lists have a + Add new option, so missing items can be created without leaving the form.
Camera details
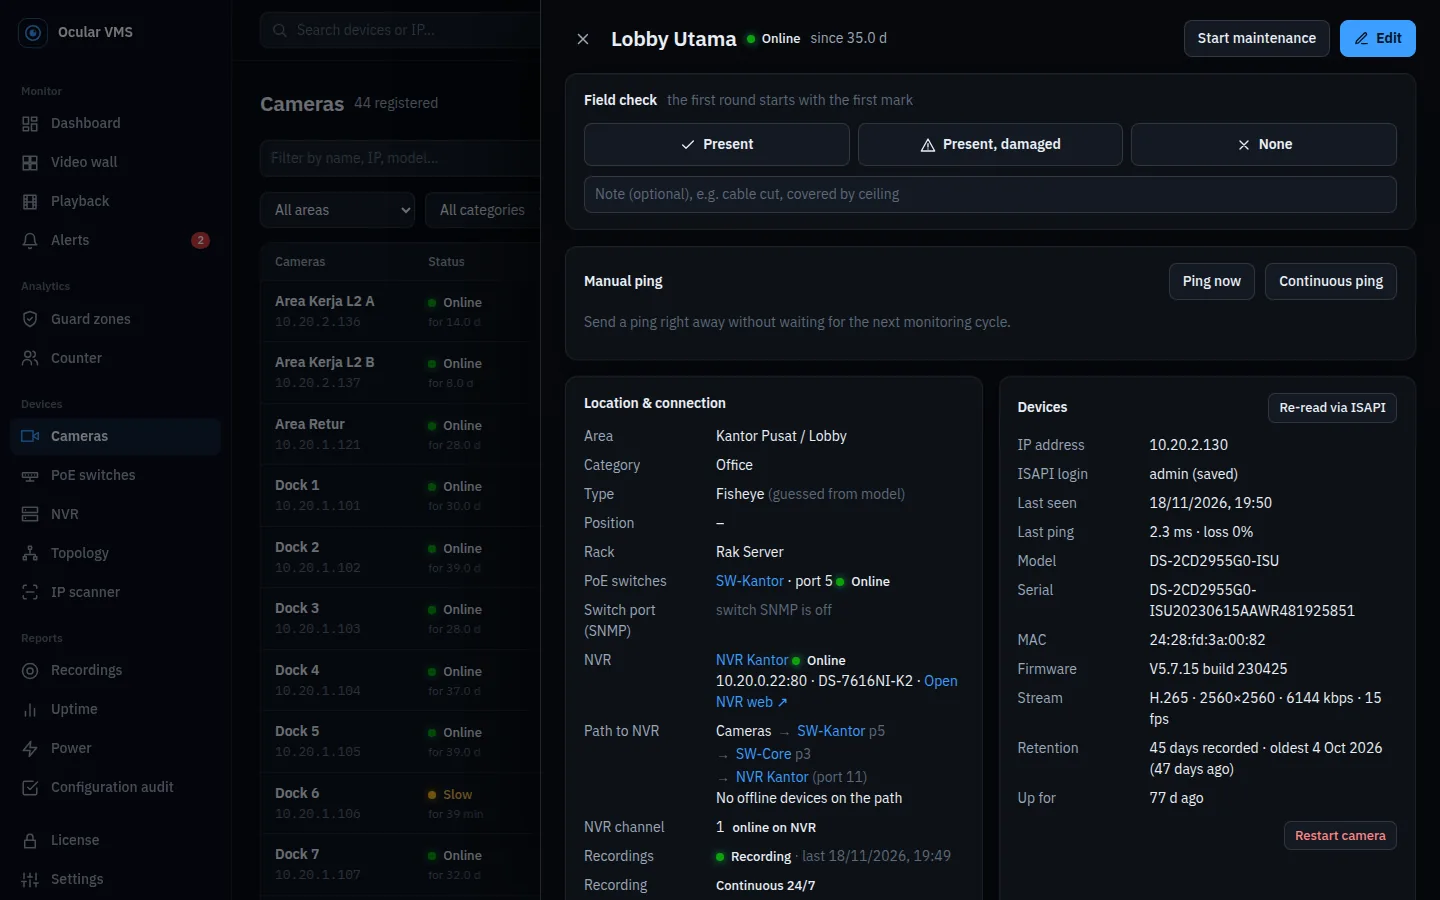
Click a camera to open a side panel; the list and its filters stay behind it. It contains:
- Location & connection: area, category, type, rack, switch and port (with port condition from SNMP), NVR and channel, the path to the NVR (switches and ports the video passes), and recording status.
- Device: IP, last ping, model, serial, MAC, firmware, stream settings, and retention.
- Live view: live video (sub-stream or main stream), digital zoom with the scroll wheel, save image, and full screen.
- Monitoring: latency and packet loss charts (6 hours to 30 days) and status history.
- Recordings: a monthly calendar from the NVR and an Open Playback button.
- Repair log: faults, actions taken, and technicians.
Renaming a camera through Edit can also write the new name to the NVR channel and the camera's OSD.
Field check
To record a physical check: in the camera panel choose Present, Present, damaged, or None, with a note if needed. Every user may mark, including view-only accounts, so a technician only needs the application on a phone. The Checked n/N button in the list shows progress, and Export produces a field check report by area, NVR, and technician. For the next routine check, an admin starts a new check round; earlier rounds are kept.
Changing many cameras at once
Click Select, tick cameras (in the table or image grid), then Change area / category, Lock port, or Sub-stream to H.264.
Last view
Every 30 minutes one image from each live camera is saved. Cameras that are down are not captured, so their last image is kept. Cameras that were already down before the system ever saw them alive get an image from their last recording on the NVR. Admins can also upload their own photo.
8. Other IP devices
For access control, intercoms, access points, attendance terminals, UPSs, and other IP devices. Settings, Device categories tab, Add category: enter a name, pick an icon, and choose whether offline devices raise alerts. The category appears as its own menu, with a red count when devices are offline. These devices are pinged, alerted on, included in automatic port mapping, and can be imported from Excel.
9. IP scanner and SADP
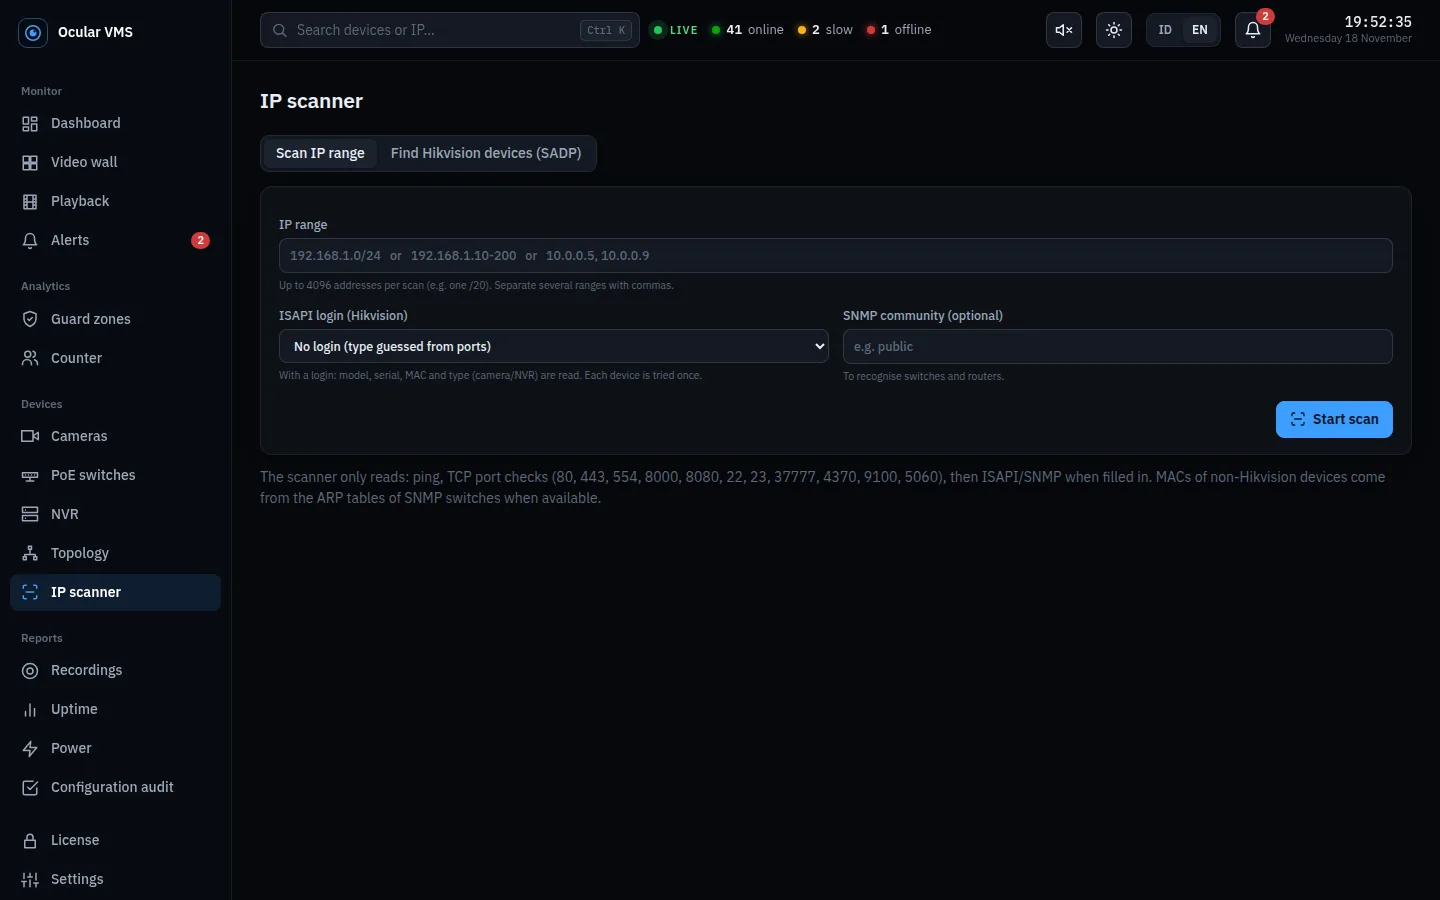
Scanning an IP range
- Enter the IP range, e.g.
192.168.1.0/24or192.168.1.10-200(up to 4096 addresses). - Choose the ISAPI login: none, a username and password, or the account of one of your NVRs.
- Optional: enter an SNMP community to recognise switches and routers.
- Click Start scan.
Results mark devices as new or registered, with their type (camera, NVR, switch, router, access control, printer). Tick new devices and choose Add as camera, Add as NVR, or Add to category. Complete registered data fills in missing MAC, model, and serial numbers.
Find Hikvision devices (SADP)
The second tab works like the SADP Tool: every Hikvision device on the same VLAN as the server answers within seconds, with no IP or password needed. The Check column flags IP conflicts, inactive devices, changed IPs, different subnets, and DHCP.
Devices marked Inactive can be activated directly: enter a new password (8–16 characters, at least two character types), keep Also add to the system ticked, and click Activate. Keep the password somewhere safe.
10. Topology
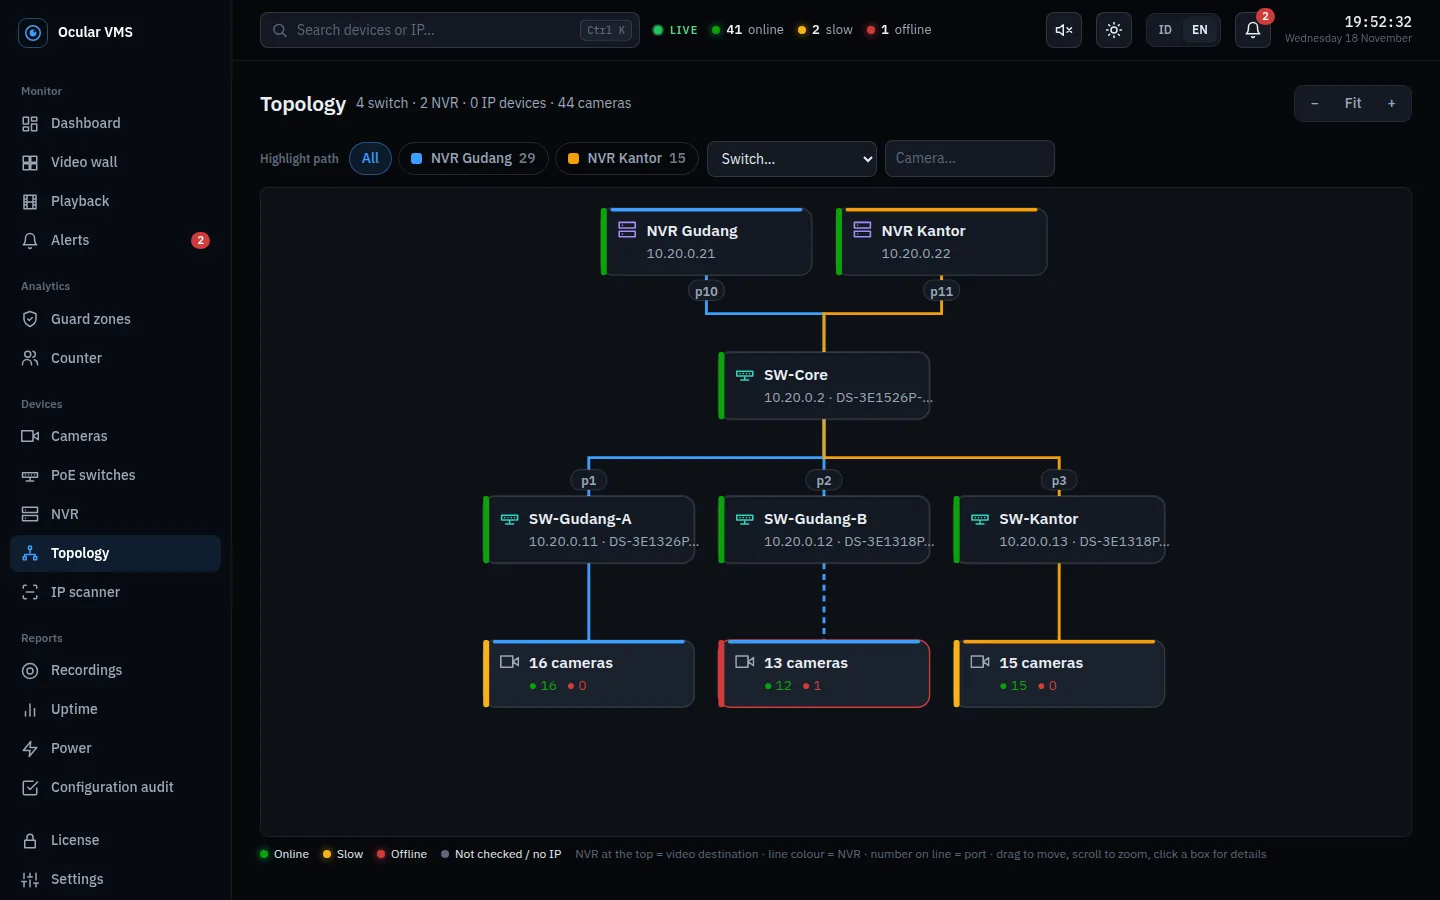
A diagram of the CCTV network with NVRs on top, then switches towards the cameras. Line colour shows which NVR the video goes to; numbers on the lines are port numbers. Use Highlight path to light up the path of one NVR, one switch, or one camera; the path is summarised below the bar, e.g. Dock 6 → SW-Gudang-A p10 → SW-Core p2 → NVR Gudang. Drag to move, scroll to zoom, click a box to open its details.
11. Video wall
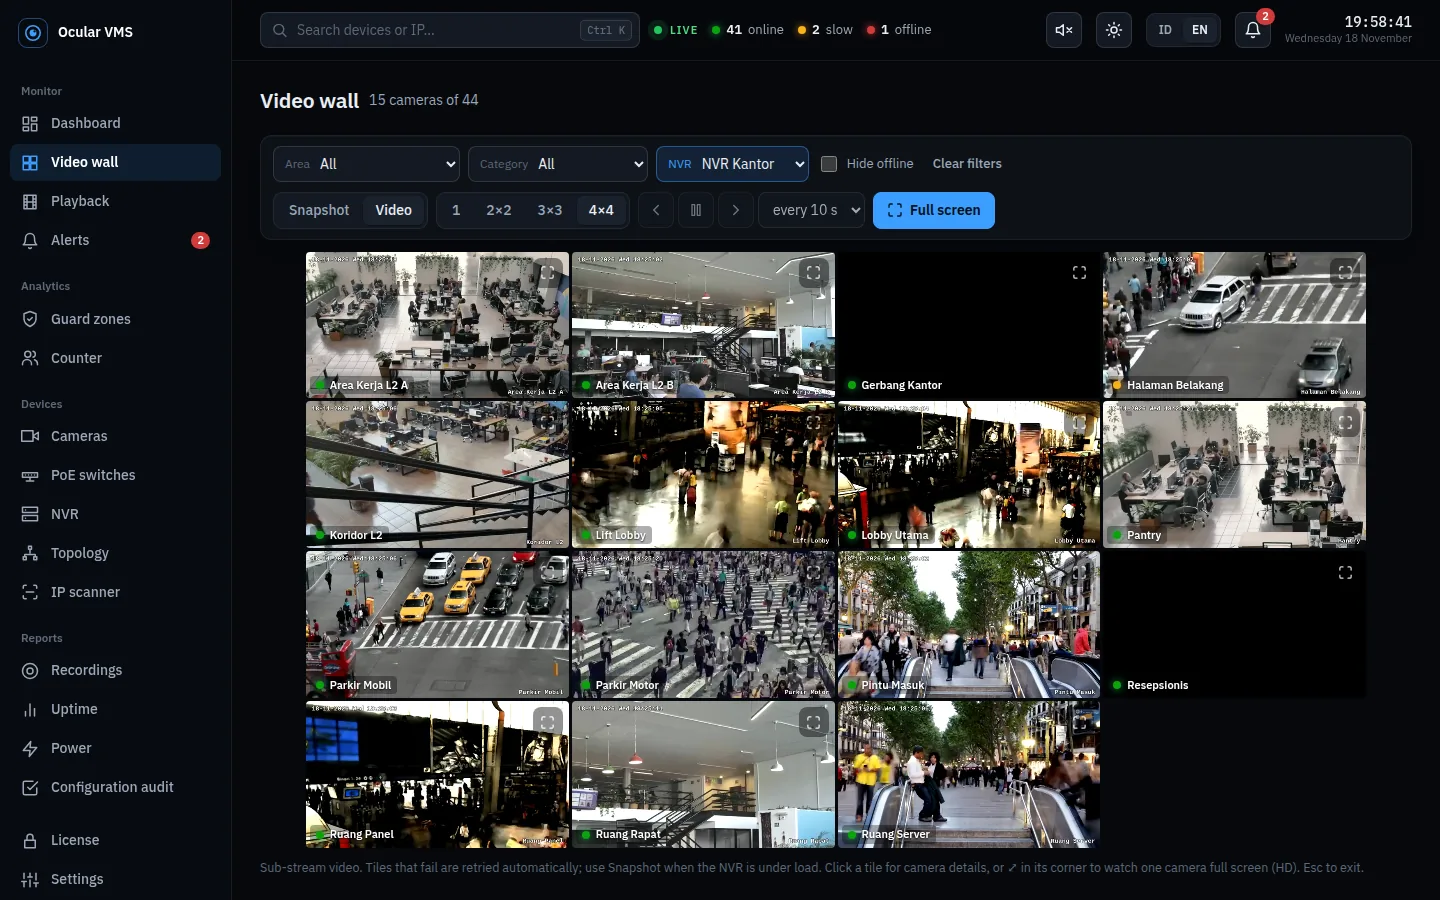
- Filters for Area, Category, NVR, and Hide offline. Filters are kept in the page address, so a "Parking only" wall can be bookmarked.
- Snapshot (an image every 3 seconds, lightest) or Video (live sub-stream video, up to 16 tiles).
- 1, 2×2, 3×3, 4×4 grids, automatic page rotation every 10–60 seconds, and Full screen.
- Click a tile for camera details, or ⤢ in its corner for one camera full screen on the main stream (HD).
12. Playback and clip download
- Open Playback, click Choose cameras, tick 1–4 cameras, then Play. Several cameras play at the same time of day, which helps follow a person from camera to camera.
- Pick a date, then click the timeline at the time you want. Green means footage exists; purple marks guard zone events.
- Controls: play/pause, back and forward 10 or 30 seconds, speed 1×–8×, digital zoom with the scroll wheel, save image, and full screen.
Keyboard shortcuts: space play/pause, left/right arrow 10 seconds, Shift+arrow 1 minute, [ and ] mark start/end.
Downloading a clip (admin)
- Mark Start and End on the timeline.
- Click Download clip, tick the cameras, and choose the format: Original from NVR (recommended for evidence, no re-encoding) or H.264, easy to play.
- Click Create clip. When it is ready, download the file for each camera and the details file with the time range, who downloaded it, and the SHA-256 fingerprint of each file to prove it is unaltered.
Up to 30 minutes per clip and 4 cameras per request. Files stay on the server for 4 hours, then are deleted automatically. Every download is recorded in the activity log.
13. Alerts and notifications
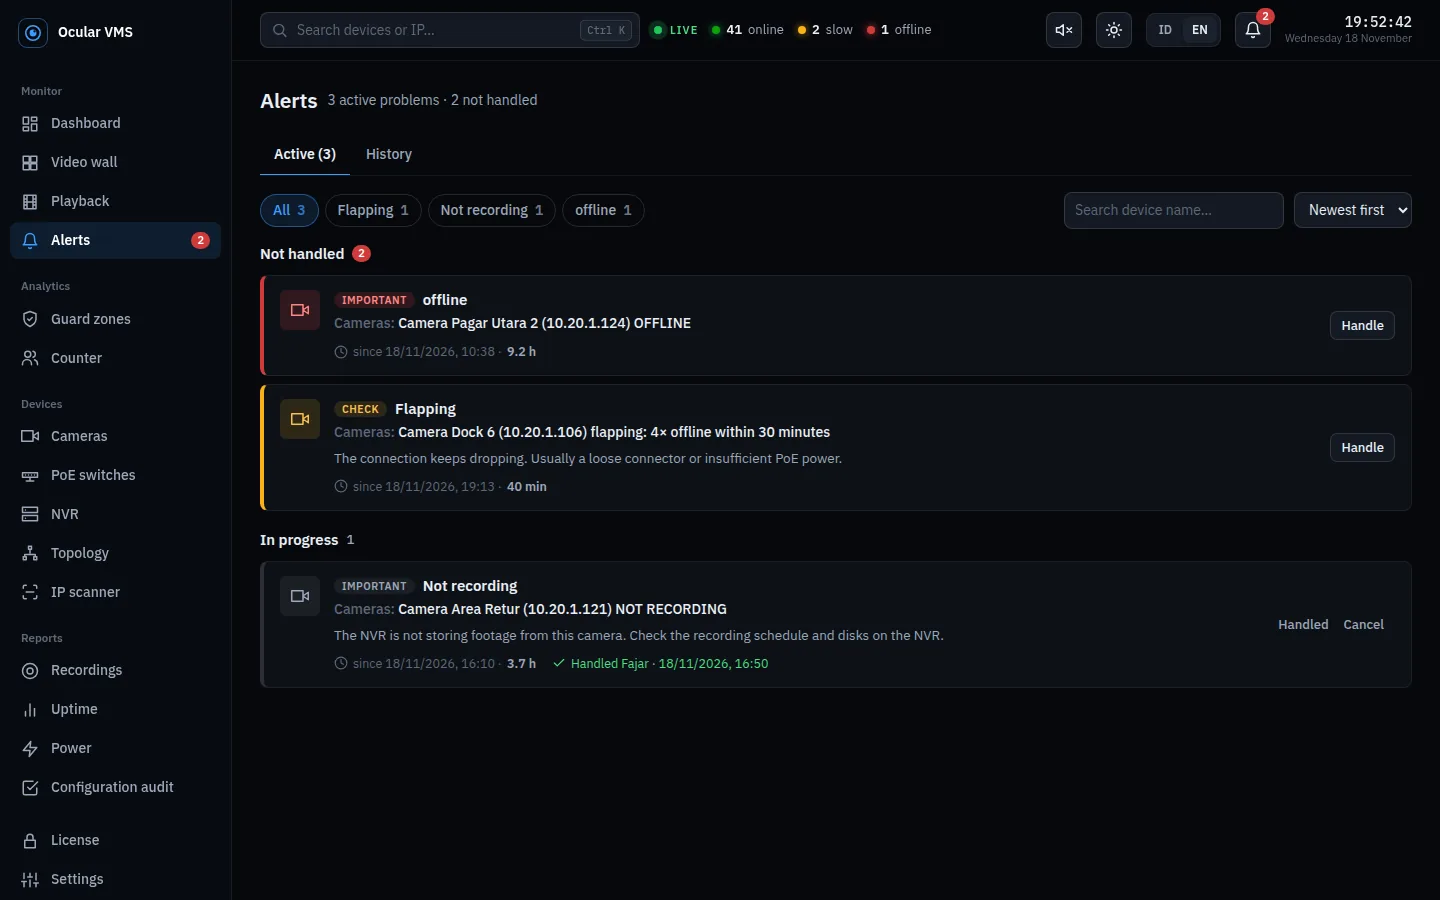
Alert types
| Type | Raised when |
|---|---|
| Camera / NVR / switch offline | No ping reply several times in a row. |
| Switch suspected | Every camera on a switch is offline while the switch itself is up. |
| Not recording | The camera is connected, but the NVR has no new footage from it. |
| HDD problem / HDD failing (SMART) | The NVR reports an abnormal disk, or SMART shows signs of failure. |
| Clock out of sync | The NVR clock is more than 60 seconds off. |
| Flapping | A device went offline 3 or more times within 60 minutes. |
| PoE fault, camera without video | From switch SNMP: a PoE fault on a camera port, or a link that is up with no video traffic. |
| Video loss, camera covered, HDD full/error, IP conflict, illegal login | Sent by the NVR as it happens (real-time events). The feature must be enabled on the NVR or camera. |
Slow status, cameras in maintenance, and cameras behind a switch that is down deliberately raise no alerts. An offline camera closes its own "not recording" and "video loss" alerts, so one problem does not appear several times.
The Alerts page
The Active tab holds cards that answer what happened (labelled IMPORTANT or CHECK), on which device, what to check, and since when. Click Handle to mark one as being dealt with, with a note if needed. The History tab lists every alert with date and type filters, mean time to repair (MTTR) and to acknowledge (MTTA), the devices with the most problems, and Excel export.
Notifications
- Control room: click the speaker icon in the top bar. Each new alert shows a message, a short sound, and a system notification. Works without internet.
- Telegram: messages to the team group when devices go down and recover. Setting up the bot token is in the installation guide.
14. Recordings and retention
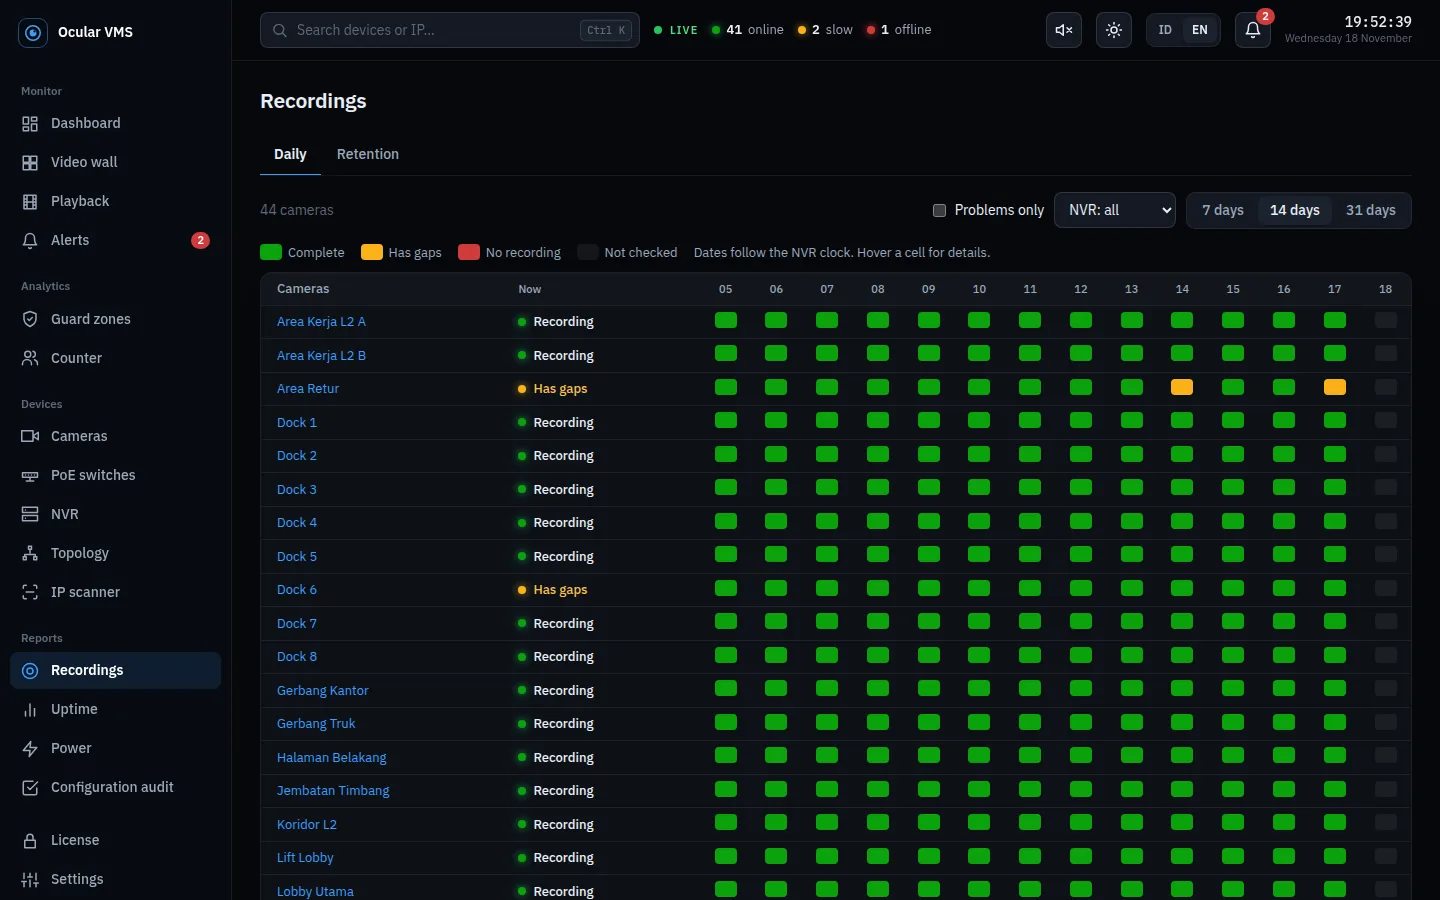
Daily tab: a camera × day table for 7, 14, or 31 days. Green is complete footage, yellow has a gap longer than 10 minutes, red has no footage, grey has not been checked. Hover a cell for the recorded percentage and the largest gap. Tick Problems only to hide cameras that are all green.
Retention tab: per NVR, the oldest recording, the camera with the shortest span, and the estimated retention once the disks are full; per camera, the oldest recording date, span in days, recorded days, and missing days. Read once a day at around 03:00.
15. Uptime report
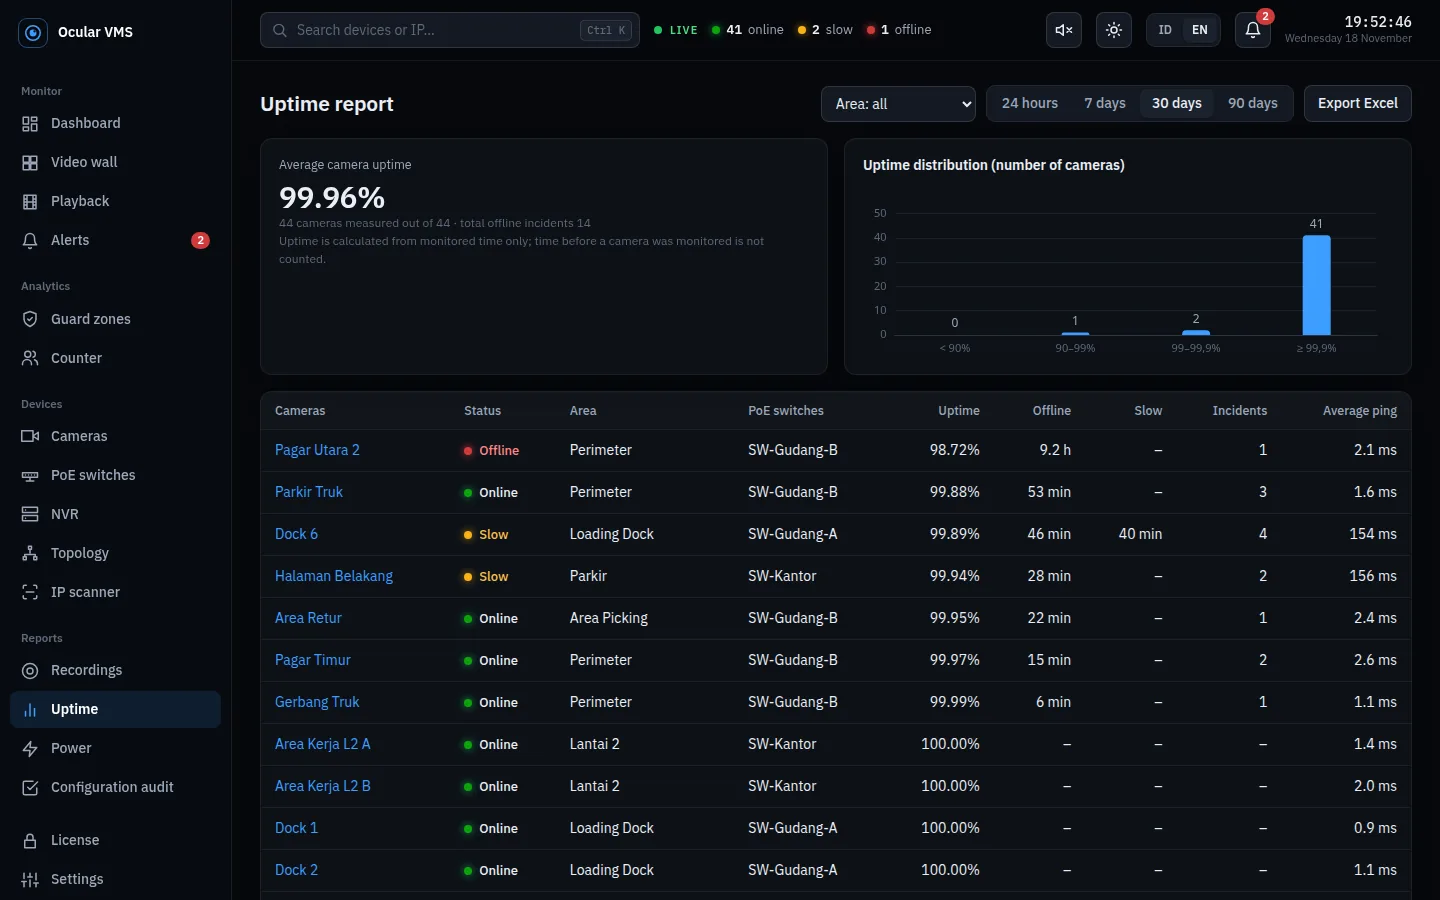
For 24 hours, 7, 30, or 90 days, filterable by area: percentage of time not offline, total offline and slow time, number of incidents, and average ping per camera. Uptime counts only time since the camera started being monitored. Cameras with many short incidents usually have a cable or connector problem. Export Excel downloads the table.
16. Power
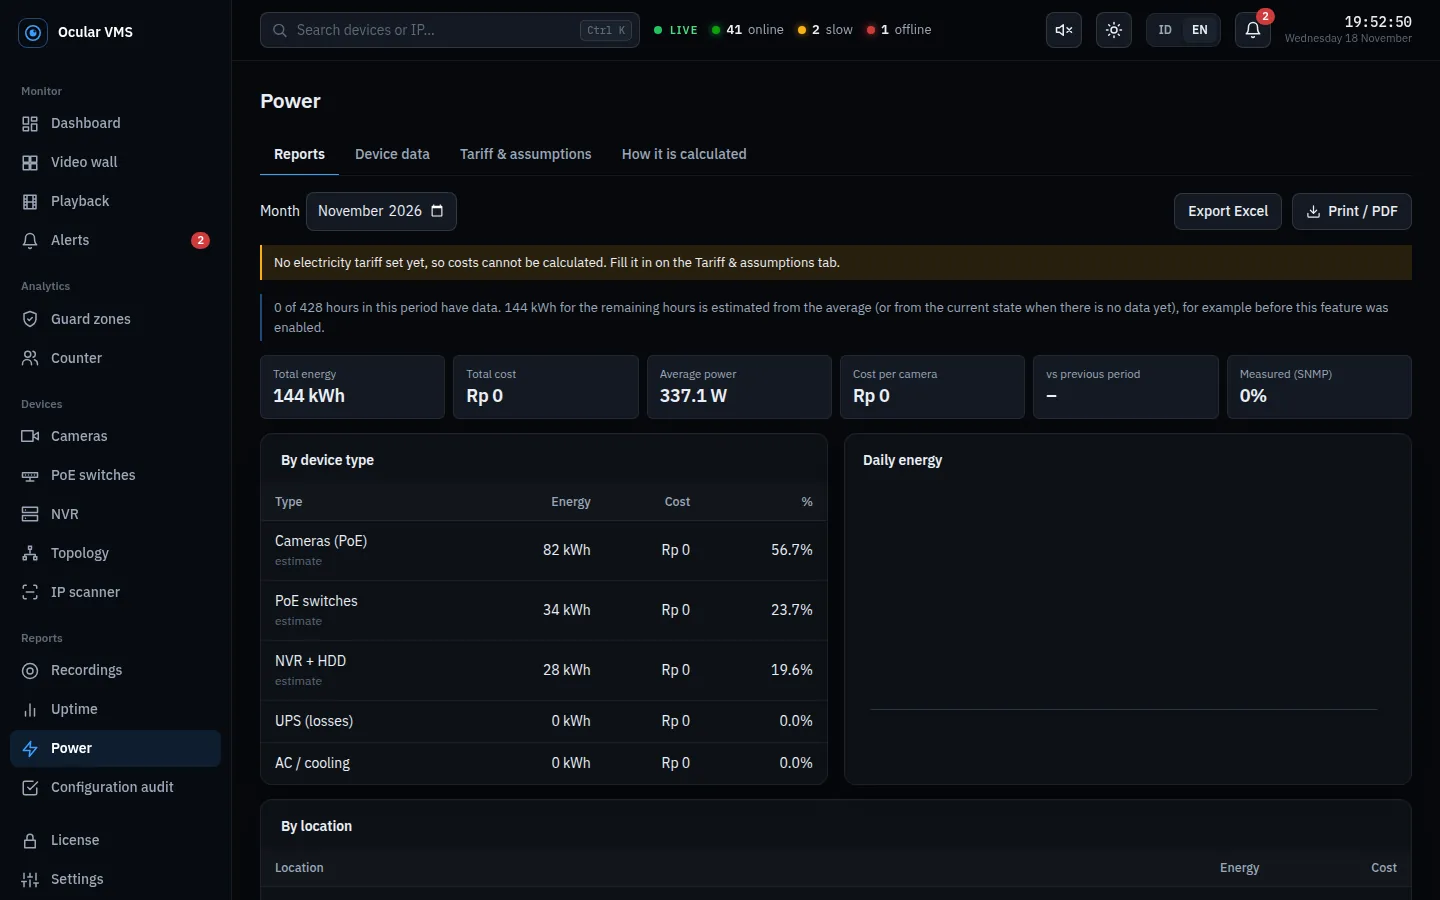
A monthly report of CCTV electricity use and cost (admin): total kWh, cost, average power, cost per camera, and breakdowns by device type, location, and device, plus a daily chart. PoE camera power is measured from switch SNMP when available; the rest comes from datasheet watts per model that you enter on the Device data tab.
On the Tariff & assumptions tab, enter the electricity tariff: a single price per kWh, or peak/off-peak pricing for tariff classes with peak hours. Export Excel and Print / PDF are available for the monthly report.
17. Configuration audit
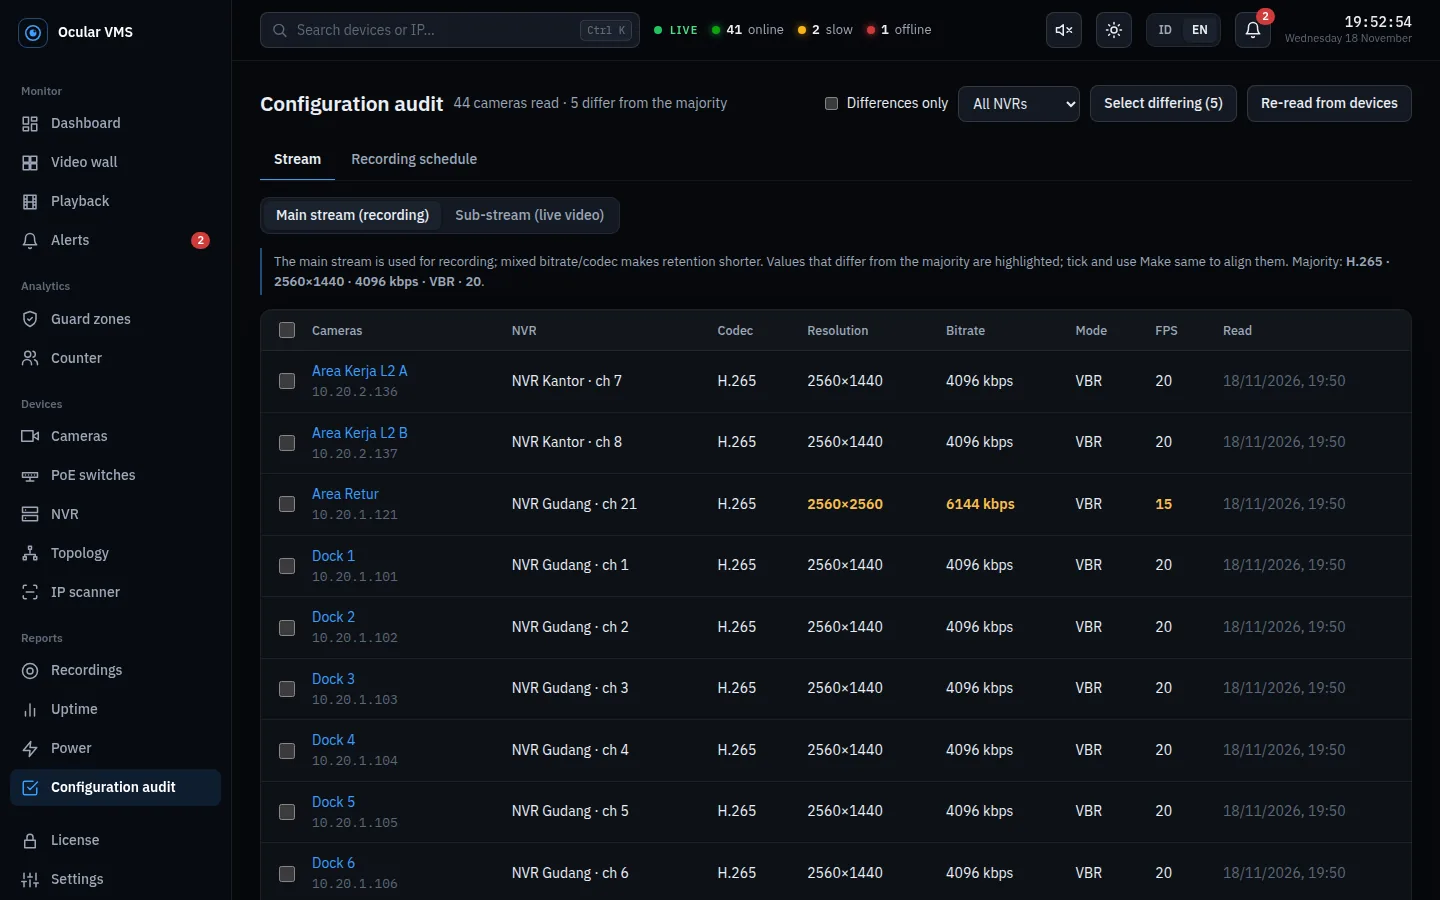
Shows each camera's main stream or sub-stream settings: codec, resolution, bitrate, bitrate mode, and FPS. Values that differ from the majority are highlighted in yellow, because a camera with a higher bitrate or a less efficient codec shortens retention for every camera on the same NVR.
Admins can align them: tick cameras (or Select differing), click Make same, enter the values to standardise (or Fill with majority values), then Apply. Settings are sent over ISAPI with progress per camera. There is a warning before changing the main stream, because it affects recording quality and retention.
The Recording schedule tab shows which cameras record 24/7, part of the time, only on events, or have no schedule at all (the camera looks normal but is never recorded).
18. People and vehicle counting
The Counter menu counts people, cars, motorcycles, trucks, buses, and bicycles from ordinary cameras, using local AI on the server's CPU with no internet. Only numbers are stored; no images, video, or face recognition.
- An admin turns the feature on in the top bar of the Counter page.
- New location: enter a name and, if needed, an active schedule (e.g. lunch 11:30–13:30, Monday–Friday).
- Marker: pick a camera, then Line (counts crossings, with in/out direction) or Area (counts how many are inside). Click its points on the camera image.
- Test detection to confirm objects in the path are detected, then Save marker.
The Results tab shows counts per 15 minutes, hour, or day, per object type, with Excel export. For accuracy, use a camera mounted high and angled slightly down, and place the line where people pass one at a time. Each line camera takes considerable CPU; a 4-core server usually handles 2–3 line cameras.
19. Guard zones
Watches specific areas, such as a back fence or a warehouse after hours. When a person or vehicle enters the area during the guard schedule, a video window of that camera pops up in the corner of the screen, on any page. The AI reacts only to the chosen object types, so swaying leaves, rain, and shadows do not trigger events.
- Open Guard zones and turn the feature on.
- Zones tab, New zone: pick a camera, click the corners of the area on the image, and choose the triggers (people, vehicles, or both).
- Set sensitivity and the guard schedule (e.g. 18:00–06:00), Test detection, then Create zone.
The Events tab holds the daily history with a photo at the busiest moment, time, duration, and a Checked button. Events also appear in purple on the Playback timeline.
20. Settings and users
Locations & racks
A site contains areas; a rack can belong to one area. Deleting an area or rack does not delete its cameras.
Monitoring
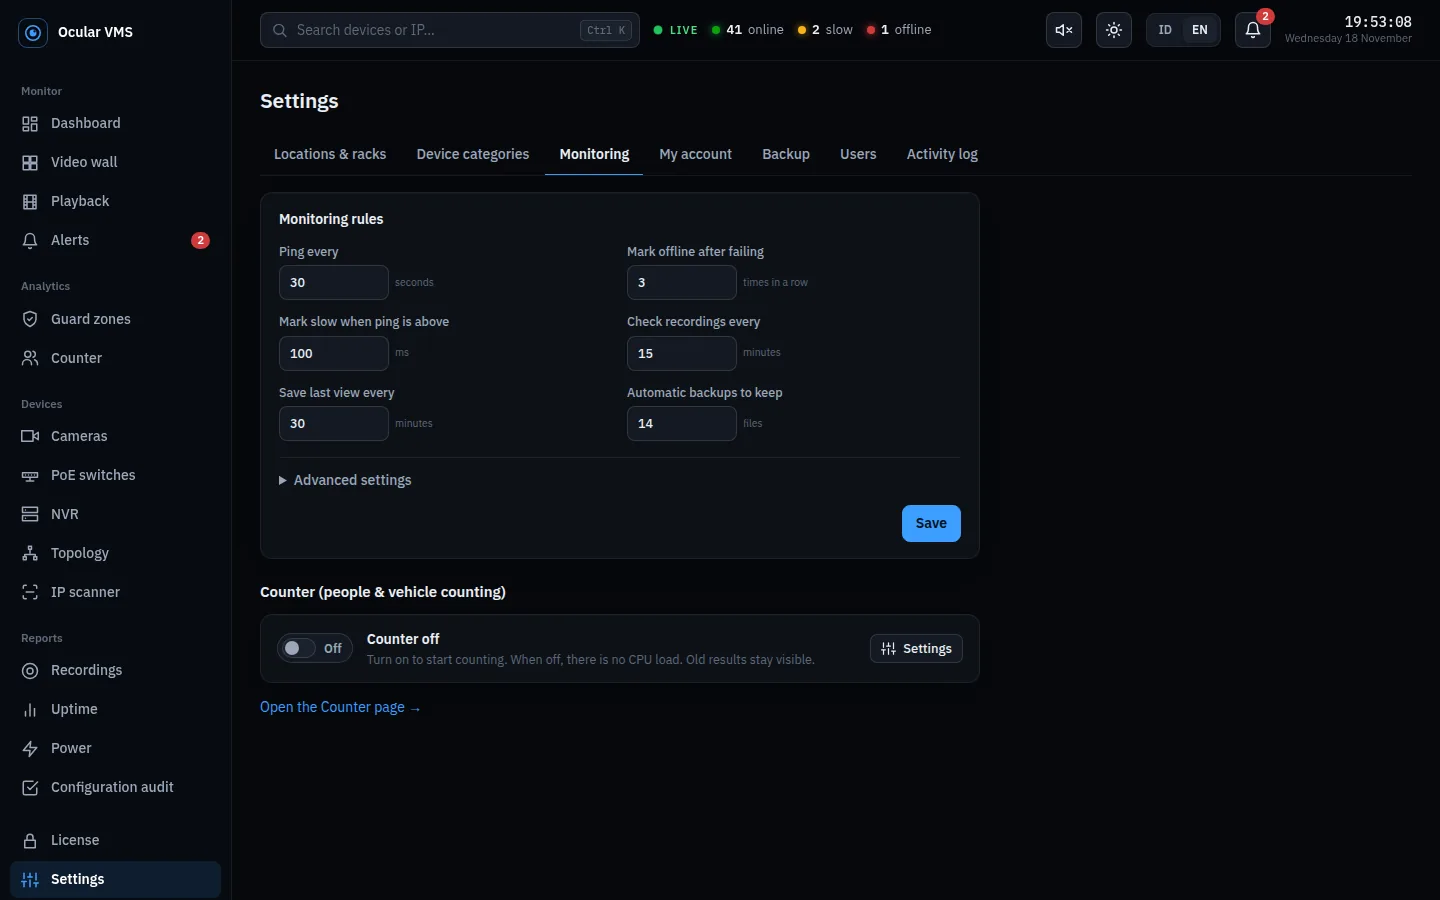
| Setting | Default |
|---|---|
| Ping every | 30 seconds |
| Mark offline after failing | 3 times in a row |
| Mark slow when ping is above | 100 ms (or packet loss above 20%) |
| Check recordings every | 15 minutes |
| Not recording when the latest recording is older than | 30 minutes |
| Flag a gap when a recording break exceeds | 10 minutes |
| Alert when the NVR clock drifts more than | 60 seconds |
| Save the last view every | 30 minutes |
| Read switch SNMP every | 120 seconds |
Changes take effect on the next cycle, without a restart.
Users and accounts
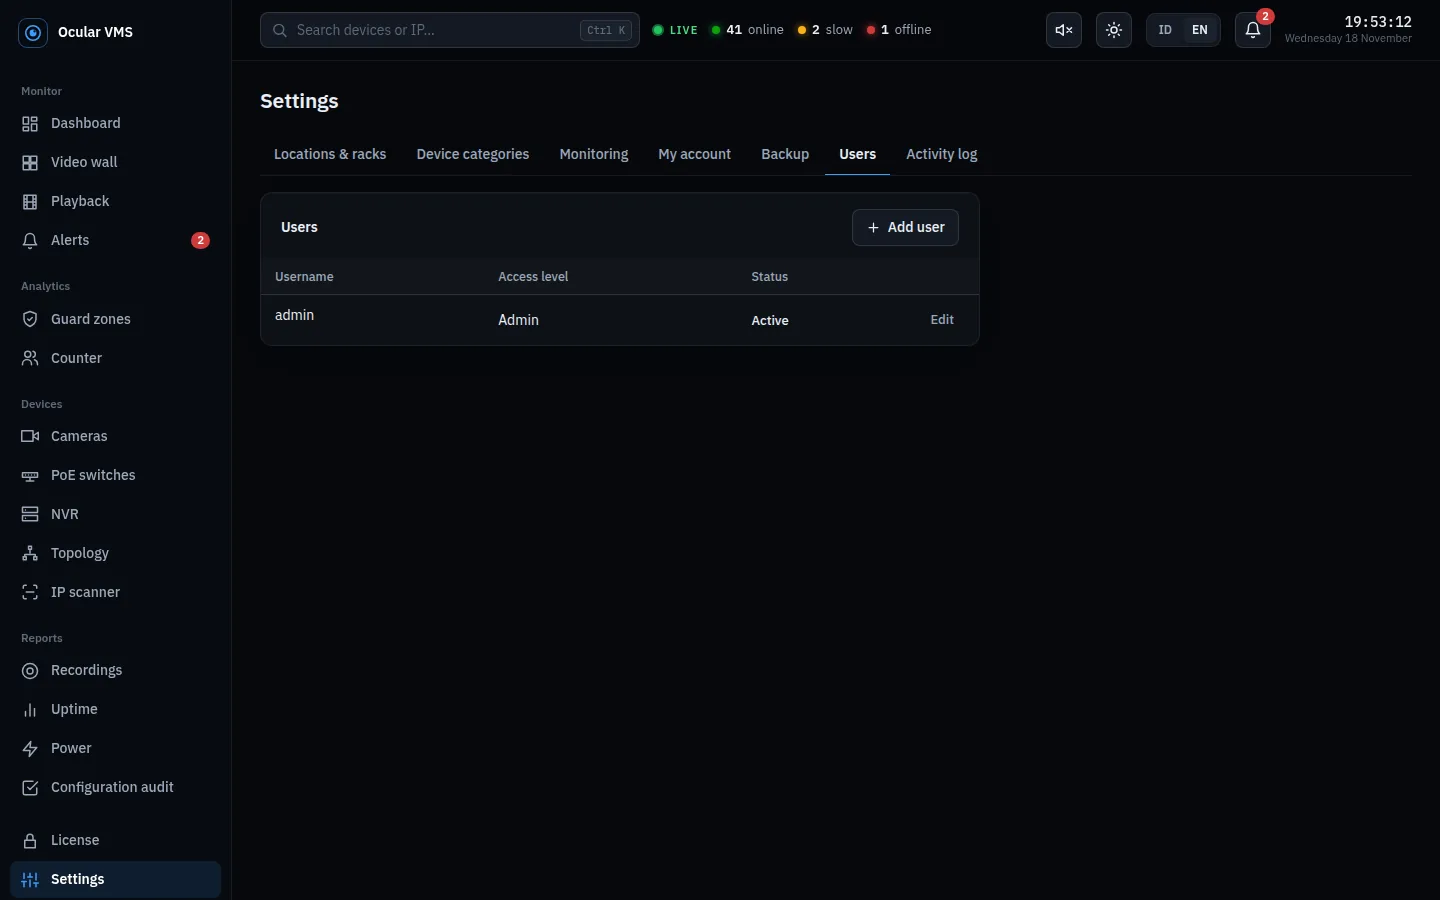
Admins add users with the Admin or View only role, change their password or role, and deactivate accounts no longer in use (accounts are not deleted, so their activity log stays traceable). Every user can change their own password on the My account tab. Five wrong passwords lock sign-in from that computer for 15 minutes.
Backup
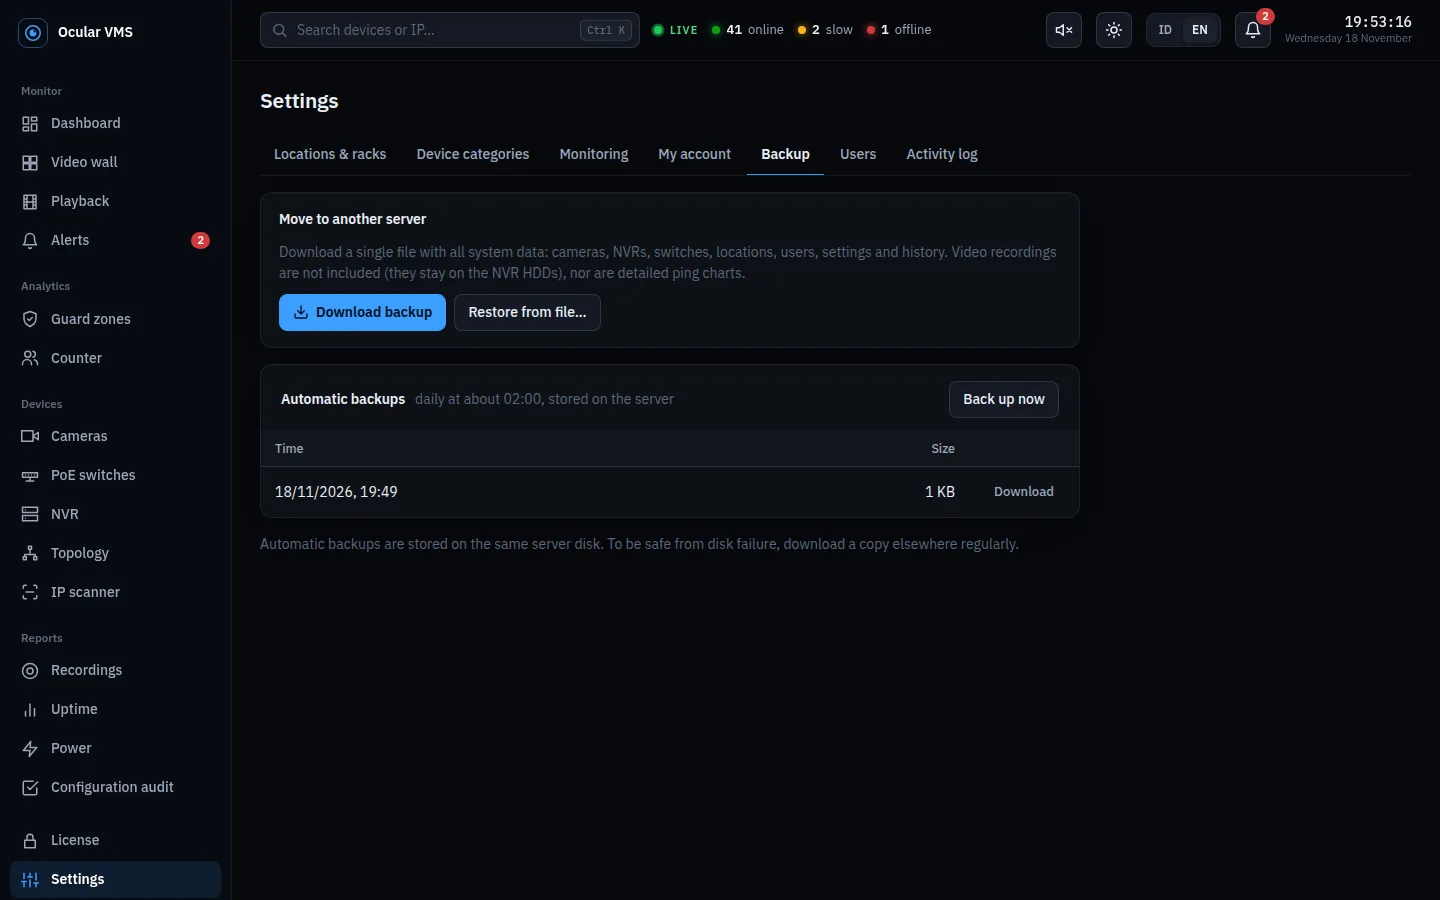
An automatic backup is made every day at around 02:00, and before every update that changes the database. Download backup regularly and keep it elsewhere; set a password if it will be restored on another server. Restore from file replaces all data, but the license active on this server is kept.
Activity log
Who did what and when: sign-ins (successful and failed, with IP address), data changes, imports, backups, device restarts, clock syncs, video viewing, and clip downloads.
21. Excel import and export
Export
In the camera list, the Export menu follows the active filters:
- Status summary: online/offline per NVR, area, category, and switch, with sheets for online, offline (longest down first), and cameras not yet on a switch.
- List + images: cameras with their last image on every row.
- Offline report A4: offline cameras with large images, ready to print for field checks.
- Handover report: one sheet per switch with a live image of each camera.
- Field check report: check results by area, NVR, and technician.
Switch export (per switch or all switches) has one row per port, with or without live images. NVR vs switch summary on the NVR page shows how many cameras on each NVR are not yet recorded on a switch port.
Camera import
Add, Import from Excel accepts .xlsx or .csv. The easiest way: export first, edit in Excel, then import back. Columns: name, ip, site, area, pos_x, pos_y, category, form_type, rack, switch, switch_port, nvr, channel, status_source, notes.
- Cameras are matched by NVR + channel, then IP, then name. Unmatched rows become new cameras.
- Empty cells do not erase existing data.
- Missing sites, areas, racks, and switches are created automatically; NVRs must already exist.
- If one row is invalid, the whole import is cancelled and the error names the row number.
22. Limitations
- Ocular VMS does not store or back up video footage; footage stays on the NVRs.
- Features that read ISAPI (recordings, disks, events, retention, audit) are tested on Hikvision devices; support can vary by model and firmware. Unsupported parts show empty or with an "ISAPI: …" message, and everything else keeps working.
- Browser video plays best from an H.264 sub-stream.
- Switches without SNMP are monitored by ping only. With SNMP, per-port PoE power is not read yet (per-port PoE status and total switch power are).
- People counting is an estimate; its accuracy depends on the camera angle.
- Retention and audit are read once a day unless refreshed manually.
- Some server error messages may still appear in Indonesian.
23. FAQ
| Question | Answer |
|---|---|
| The camera is up and visible on the NVR, but Ocular VMS shows it offline. | It is probably plugged into an NVR PoE port and cannot be pinged. Set its status source to NVR channel (section 3). |
| Almost every camera shows "Has gaps" or "Not recording". | The NVR records on motion only. Raise the two recording thresholds under Settings, Monitoring. |
| The NVR card shows "–" for disks or clock. | Click Check now. If an "ISAPI: …" message appears, that part cannot be read from this NVR; send the message and the NVR model to support. |
| Cameras behind a dead switch do not appear as alerts. | By design: one dead switch raises one switch alert with the number of affected cameras, not dozens of alerts. |
| No sound on alerts. | Make sure the speaker icon is on and the page is open. Browsers only allow sound after the page has been clicked once. |
| Video does not show on the wall. | Usually the camera's sub-stream is H.265. Switch it to H.264 from the message in the video tile, or use Snapshot mode. |
| How long is data kept? | Detailed ping data 30 days, hourly data 2 years. Status history, alerts, and repair logs indefinitely. |
| Does deleting a camera delete its history? | Yes. If a camera is only switched off temporarily, use maintenance mode. |
| Forgotten password. | Ask an admin to change it under Settings, Users. If the only admin forgot it, contact support. |
Need help? WhatsApp +62 851-5886-9026 or email support@ocularvms.my.id.